Difference between revisions of "Ubuntu Enterprise Cloud"
Onnowpurbo (talk | contribs) |
Onnowpurbo (talk | contribs) |
||
| Line 296: | Line 296: | ||
| − | The following is by far the simplest way to install an image. However, advanced users may be interested in learning how to Bundle their own image. | + | The following is by far the simplest way to install an image. However, advanced users may be interested in learning how to [[UECBundlingImages | Bundle their own image]]. |
The simplest way to add an image to UEC is to install it from the Image Store on the UEC web interface. | The simplest way to add an image to UEC is to install it from the Image Store on the UEC web interface. | ||
| Line 316: | Line 316: | ||
[[Image:Private-images-cr.png|center|200px|thumb]] | [[Image:Private-images-cr.png|center|200px|thumb]] | ||
| − | |||
==STEP 7: Run an Image== | ==STEP 7: Run an Image== | ||
Revision as of 17:37, 1 October 2010
Objective
From this Tutorial you will learn how to install, configure, register and perform several operations on a basic UEC setup that results in a cloud with a one controller "front-end" and one or several node(s) for running Virtual Machine (VM) instances. You will also use examples to help get you started using your own private compute cloud.
Download
- Download iso Ubuntu Server dari
http://www.ubuntu.com/server/get-ubuntu/download
STEP 1: Prerequisites
To deploy a minimal cloud infrastructure, you’ll need at least two dedicated systems:
- a front end
- one or more node(s)
The following are recommendations, rather than fixed requirements. However, our experience in developing this documentation indicated the following suggestions.
Front End
Use the following table for a system that will run one or more of:
- the cloud controller (clc)
- the cluster controller (cc)
- walrus (the S3-like storage service)
- the storage controller (sc)
| Hardware | Minimum | Suggested | Notes |
|---|---|---|---|
| CPU | 1GHz | 2 x 2GHz | for an all-in-one front end, it helps to have at least a dual core processor |
| Memory | 2GB | 4GB | the Java web front end benefits from lots of available memory |
| Disk | 5400rpm IDE | 7200rpm SATA | slower disks will work, but will yield much longer instance startup times |
| Disk Space | 40GB | 200GB | 40GB is only enough space for only a single image, cache, etc., Eucalyptus does not like to run out of disk space |
| Networking | 100Mbps | 1000Mbps | machine images are hundreds of MB, and need to be copied over the network to nodes |
Node(s)
The other system(s) are nodes, which will run:
- the node controller (nc)
These systems will actually run the instances. You will need one or more systems with:
| Hardware | Minimum | Suggested | Notes |
|---|---|---|---|
| CPU | VT extensions | VT, 64-bit, Multicore | 64-bit can run both i386, and amd64 instances; by default, Eucalyptus will only run 1 VM per CPU core on a Node |
| Memory | 1GB | 4GB | additional memory means more, and larger guests |
| Disk | 5400rpm IDE | 7200rpm SATA or SCSI | Eucalyptus nodes are disk-intensive; I/O wait will likely be the performance bottleneck |
| Disk Space | 40GB | 100GB | images will be cached locally, Eucalyptus does not like to run out of disk space |
| Networking | 100Mbps | 1000Mbps | machine images are hundreds of MB, and need to be copied over the network to nodes |
STEP 2: Install the Cloud/Cluster/Storage/Walrus Front End Server
- Download the 10.04 Server ISO
- When you boot, select “Install Ubuntu Enterprise Cloud”.
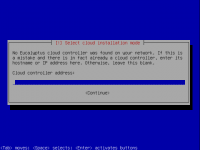
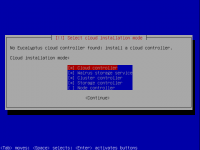
- The installer will detect if any other Eucalyptus components are present.
- You can then choose which components to install, based on your chosen topology.
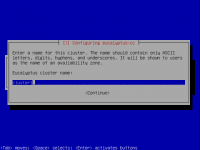
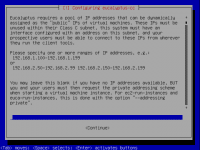
- It will ask two other cloud-specific questions during the course of the install:
- Name of your cluster, e.g. cluster1.
- A range of public IP addresses on the LAN that the cloud can allocate to instances, e.g. 192.168.1.200-192.168.1.249.
STEP 3: Install the Node Controller(s)
The node controller install is even simpler. Just make sure that you are connected to the network on which the cloud/cluster controller is already running.
- Boot from the same ISO on the node(s)
- Select “Install Ubuntu Enterprise Cloud”
- It should detect the Cluster and preselect “Node” install for you
- Confirm the partitioning scheme
- The rest of the installation should proceed uninterrupted; complete the installation and reboot the node
STEP 4: Register the Node(s)
As of Ubuntu 10.04 LTS, all component registration should be automatic, assuming:
- Public SSH keys have been exchanged properly
- The services are configured properly
- The services are publishing their existence
- The appropriate uec-component-listener is running
- Verify Registration.
Steps a to e should only be required if you're using the UEC/PackageInstall method. Otherwise, if you are following the UEC/CDInstall method, these steps should already be completed automatically for you, and therefore you can skip a to e.
Exchange Public SSH Keys
The Cloud Controller's eucalyptus user needs to have SSH access to the Walrus Controller, Cluster Controller, and Storage Controller as the eucalyptus user.
Install the Cloud Controller's eucalyptus user's public ssh key by:
- On the target controller, temporarily set a password for the eucalyptus user:
sudo passwd eucalyptus
- Then, on the Cloud Controller:
sudo -u eucalyptus ssh-copy-id -i /var/lib/eucalyptus/.ssh/id_rsa.pub eucalyptus@<IP_OF_NODE>
- You can now remove the password of the eucalyptus account on the target controller, if you wish:
sudo passwd -d eucalyptus
Configure the Services
On the Cloud Controller:
- For the Cluster Controller Registration:
- Define the shell variable CC_NAME in /etc/eucalyptus/eucalyptus-cc.conf
- Define the shell variable CC_IP_ADDR in /etc/eucalyptus/eucalyptus-ipaddr.conf, as a space separated list of one or more IP addresses.
- For the Walrus Controller Registration:
- Define the shell variable WALRUS_IP_ADDR in /etc/eucalyptus/eucalyptus-ipaddr.conf, as a single IP address.
On the Cluster Controller:
- For Storage Controller Registration:
- Define the cluster name in the shell variable CC_NAME in /etc/eucalyptus/eucalyptus-cc.conf
- Define the shell variable SC_IP_ADDR in /etc/eucalyptus/eucalyptus-ipaddr.conf, as a space separated list of one or more IP addresses.
Publish
Now start the publication services.
- Walrus Controller:
sudo start eucalyptus-walrus-publication
- Cluster Controller:
sudo start eucalyptus-cc-publication
- Storage Controller:
sudo start eucalyptus-sc-publication
- Node Controller
sudo start eucalyptus-nc-publication
Start the Listener
On the Cloud Controller and the Cluster Controller(s), run:
sudo start uec-component-listener
Verify Registration
cat /var/log/eucalyptus/registration.log
2010-04-08 15:46:36-05:00 | 24243 -> Calling node cluster1 node 10.1.1.75
2010-04-08 15:46:36-05:00 | 24243 -> euca_conf --register-nodes returned 0
2010-04-08 15:48:47-05:00 | 25858 -> Calling walrus Walrus 10.1.1.71
2010-04-08 15:48:51-05:00 | 25858 -> euca_conf --register-walrus returned 0
2010-04-08 15:49:04-05:00 | 26237 -> Calling cluster cluster1 10.1.1.71
2010-04-08 15:49:08-05:00 | 26237 -> euca_conf --register-cluster returned 0
2010-04-08 15:49:17-05:00 | 26644 -> Calling storage cluster1 storage 10.1.1.71
2010-04-08 15:49:18-05:00 | 26644 -> euca_conf --register-sc returned 0
STEP 5: Obtain Credentials
After installing and booting the Cloud Controller, users of the cloud will need to retrieve their credentials. This can be done either through a web browser, or at the command line.
From a Web Browser
- From your web browser (either remotely or on your Ubuntu server) access the following URL:
https://<cloud-controller-ip-address>:8443/
Important! You must use a secure connection, so make sure you use "https" not "http" in your URL. You will get a security certificate warning. You will have to add an exception to view the page. If you do not accept it you will not be able to view the Eucalyptus configuration page.
- Use username 'admin' and password 'admin' for the first time login (you will be prompted to change your password).
- Then follow the on-screen instructions to update the admin password and email address.
- Once the first time configuration process is completed, click the 'credentials' tab located in the top-left portion of the screen.
- Click the 'Download Credentials' button to get your certificates
- Save them to ~/.euca
- Unzip the downloaded zipfile into a safe location (~/.euca)
unzip -d ~/.euca mycreds.zip
From a Command Line
Alternatively, if you are on the command line of the Cloud Controller, you can run:
mkdir -p ~/.euca
chmod 700 ~/.euca
cd ~/.euca
sudo euca_conf --get-credentials mycreds.zip
unzip mycreds.zip
ln -s ~/.euca/eucarc ~/.eucarc
cd -
Extracting and Using Your Credentials
Now you will need to setup EC2 API and AMI tools on your server using X.509 certificates.
- Install the required cloud user tools:
sudo apt-get install euca2ools
- To validate that everything is working correctly, get the local cluster availability details:
. ~/.euca/eucarc
euca-describe-availability-zones verbose
AVAILABILITYZONE   myowncloud                 192.168.1.1
AVAILABILITYZONE   |- vm types                free / max   cpu   ram  disk
AVAILABILITYZONE   |- m1.small                0004 / 0004   1    192     2
AVAILABILITYZONE   |- c1.medium               0004 / 0004   1    256     5
AVAILABILITYZONE   |- m1.large                0002 / 0002   2    512    10
AVAILABILITYZONE   |- m1.xlarge               0002 / 0002   2   1024    20
AVAILABILITYZONE   |- c1.xlarge               0001 / 0001   4   2048    20
STEP 6: Install an image from the store
The following is by far the simplest way to install an image. However, advanced users may be interested in learning how to Bundle their own image.
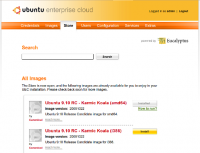
The simplest way to add an image to UEC is to install it from the Image Store on the UEC web interface.
- Access the web interface at the following URL (Make sure you specify https):
https://<cloud-controller-ip-address>:8443/
- Enter your login and password (if requested, as you may still be logged in from earlier)
- Click on the Store tab
- Browse available images
- Click on install for the image you want
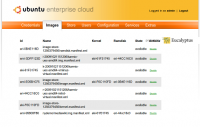
Once the image has been downloaded and installed, you can click on "How to run?" that will be displayed below the image button to view the command to execute to instantiate (start) this image. The image will also appear on the list given on the Image tab.
STEP 7: Run an Image
There are multiple ways to instantiate an image in UEC:
- Use the command line
- Use one of the UEC compatible management tools such as Landscape
- Use the ElasticFox extension to Firefox
Here we will describe the process from the command line:
- Before running an instance of your image, you should first create a keypair (ssh key) that you can use to log into your instance as root, once it boots. The key is stored, so you will only have to do this once. Run the following command:
if [ ! -e ~/.euca/mykey.priv ]; then
    mkdir -p -m 700 ~/.euca
    touch ~/.euca/mykey.priv
    chmod 0600 ~/.euca/mykey.priv
    euca-add-keypair mykey > ~/.euca/mykey.priv
fi
Note: You can call your key whatever you like (in this example, the key is called 'mykey'), but remember what it is called. If you forget, you can always run euca-describe-keypairs to get a list of created keys stored in the system.
- You must also allow access to port 22 in your instances:
euca-authorize default -P tcp -p 22 -s 0.0.0.0/0
- Next, you can create instances of your registered image:
euca-run-instances $EMI -k mykey -t m1.small
Note: If you receive an error regarding image_id, you may find it by viewing Images page or click "How to Run" on the Store page to see the sample command.
- The first time you run an instance, the system will be setting up caches for the image from which it will be created. This can often take some time the first time an instance is run given that VM images are usually quite large. To monitor the state of your instance, run:
watch -n5 euca-describe-instances
In the output, you should see information about the instance, including its state. While first-time caching is being performed, the instance's state will be 'pending'.
- When the instance is fully started, the above state will become 'running'. Look at the IP address assigned to your instance in the output, then connect to it:
IPADDR=$(euca-describe-instances | grep $EMI | grep running | tail -n1 | awk '{print $4}')
ssh -i ~/.euca/mykey.priv ubuntu@$IPADDR
- And when you are done with this instance, exit your SSH connection, then terminate your instance:
INSTANCEID=$(euca-describe-instances | grep $EMI | grep running | tail -n1 | awk '{print $2}')
euca-terminate-instances $INSTANCEID
More Information
How to use the Storage Controller
Controlling eucalyptus services:
- sudo service eucalyptus [start|stop|restart] (on the CLC/CC/SC/Walrus side)
- sudo service eucalyptus-nc [start|stop|restart] (on the Node side)
Locations of some important files:
- Log files:
/var/log/eucalyptus
- Configuration files:
/etc/eucalyptus
- Database:
/var/lib/eucalyptus/db
- Keys
/var/lib/eucalyptus
/var/lib/eucalyptus/.ssh
Notes:
- Don't forget to source your ~/.euca/eucarc before running the client tools.
Links:
- Eucalyptus Project Site (forums, documentation, downloads)
- Eucalyptus on Launchpad (bugs, code)
- Eucalyptus Troubleshooting (1.5)
- Register your cloud with RightScale
Glossary
The Ubuntu Enterprise Cloud documentation uses terminology that might be unfamiliar to some readers. This page is intended to provide a glossary of such terms and acronyms.
- Cloud - A federated set of physical machines that offer computing resources through virtual machines, provisioned and recollected dynamically.
- Cloud Controller (CLC) - Eucalyptus component that provides the web UI (an https server on port 8443), and implements the Amazon EC2 API. There should be only one Cloud Controller in an installation of UEC. This service is provided by the Ubuntu eucalyptus-cloud package.
- Cluster - A collection of nodes, associated with a Cluster Controller. There can be more than one Cluster in an installation of UEC. Clusters are sometimes physically separate sets of nodes. (e.g. floor1, floor2, floor2).
- Cluster Controller (CC) - Eucalyptus component that manages collections of node resources. This service is provided by the Ubuntu eucalyptus-cc package.
- EBS - Elastic Block Storage. http://aws.amazon.com/ebs/
- EC2 - Elastic Compute Cloud. Amazon's pay-by-the-hour, pay-by-the-gigabyte public cloud computing offering.
- EKI - Eucalyptus Kernel Image.
- EMI - Eucalyptus Machine Image.
- ERI - Eucalyptus Ramdisk Image.
- Eucalyptus - Elastic Utility Computing Architecture for Linking Your Programs To Useful Systems. An open source project originally from the University of California at Santa Barbara, now supported by Eucalyptus Systems, a Canonical Partner.
- Front-end - Physical machine hosting one (or more) of the high level Eucalyptus components (cloud, walrus, storage controller, cluster controller).
- Node - A node is a physical machine that's capable of running virtual machines, running a node controller. Within Ubuntu, this generally means that the CPU has VT extensions, and can run the KVM hypervisor.
- Node Controller (NC) - Eucalyptus component that runs on nodes which host the virtual machines that comprise the cloud. This service is provided by the Ubuntu package eucalyptus-nc.
- S3 - Simple Storage Service. Amazon's pay-by-the-gigabyte persistent storage solution for EC2. http://aws.amazon.com/s3/
- Storage Controller (SC) - Eucalyptus component that manages dynamic block storage services (EBS). Each 'cluster' in a Eucalyptus installation can have its own Storage Controller. This component is provided by the 'eucalyptus-sc' package.
- UEC - Ubuntu Enterprise Cloud. Ubuntu's cloud computing solution, based on Eucalyptus.
- VM - Virtual Machine.
- VT - Virtualization Technology. An optional feature of some modern CPUs, allowing for accelerated virtual machine hosting.
- Walrus - Eucalyptus component that implements the Amazon S3 API, used for storing VM images and user storage using S3 bucket put/get abstractions.
Referensi
- http://www.ubuntu.com/cloud/private
- http://www.ubuntu.com/cloud/private/deploy
- https://help.ubuntu.com/community/UEC
- https://help.ubuntu.com/community/UEC/CDInstall

