Difference between revisions of "VyOS: OSPF Sederhana"
Jump to navigation
Jump to search
Onnowpurbo (talk | contribs) (→OSPF) |
Onnowpurbo (talk | contribs) |
||
| (3 intermediate revisions by the same user not shown) | |||
| Line 23: | Line 23: | ||
eth3: -- LAN 192.168.1.1/24 | eth3: -- LAN 192.168.1.1/24 | ||
| + | |||
| + | Setiap kali menjalankan VM VyOS di GNS3, lakukan | ||
| + | |||
| + | sudo chown root:useranda /dev/kvm | ||
| + | |||
| + | sebelum me-RUN setiap VM VyOS satu per satu. | ||
==IP address== | ==IP address== | ||
| Line 123: | Line 129: | ||
==Verify== | ==Verify== | ||
| − | Cek | + | Cek R1, R2, R3 |
| − | |||
| − | R1 | ||
| − | |||
| − | |||
| − | |||
| − | |||
| − | |||
| − | |||
| − | |||
| − | |||
| − | |||
| − | |||
| − | |||
| − | |||
| + | show ip ospf database | ||
| + | show ip ospf neighbor | ||
| + | show ip ospf route | ||
| + | show ip route | ||
==Referensi== | ==Referensi== | ||
| Line 153: | Line 149: | ||
* [[Cisco]] | * [[Cisco]] | ||
* [[Juniper]] | * [[Juniper]] | ||
| − | * [[ | + | * [[BIRD1]] |
| + | * [[BIRD2]] | ||
* [[IPv6]] | * [[IPv6]] | ||
| Line 160: | Line 157: | ||
* [[IPv6: Advanced Routing]] | * [[IPv6: Advanced Routing]] | ||
* [[IPv6: Quagga]] | * [[IPv6: Quagga]] | ||
| + | * [[IPv6: VyOS]] | ||
* [[IPv6: Mikrotik]] | * [[IPv6: Mikrotik]] | ||
* [[IPv6: Cisco]] | * [[IPv6: Cisco]] | ||
* [[IPv6: Juniper]] | * [[IPv6: Juniper]] | ||
| − | * [[IPv6: | + | * [[IPv6: BIRD1]] |
| + | * [[IPv6: BIRD2]] | ||
* [[IPv6]] | * [[IPv6]] | ||
Latest revision as of 11:06, 20 January 2019
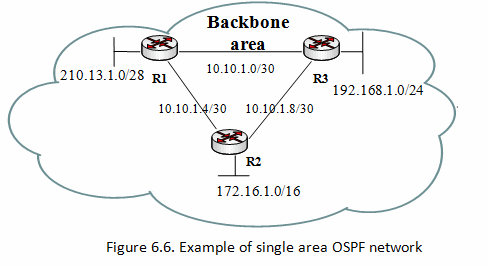
Sambungan
R1
eth1: -- R3: eth1
eth2: -- R2: eth1
eth3: -- Internet
R2:
eth1: -- R1: eth2
eth2: -- R3: eth2
eth3: -- LAN 172.16.1.1/16
R3:
eth1: -- R1: eth1
eth2: -- R2: eth2
eth3: -- LAN 192.168.1.1/24
Setiap kali menjalankan VM VyOS di GNS3, lakukan
sudo chown root:useranda /dev/kvm
sebelum me-RUN setiap VM VyOS satu per satu.
IP address
R1:
configure
set interfaces ethernet eth1 address '10.10.1.1/30'
set interfaces ethernet eth2 address '10.10.1.5/30'
set interfaces ethernet eth3 address '192.168.122.100/24'
set interfaces ethernet eth3 address '192.168.122.101/24'
set interfaces ethernet eth3 address '192.168.122.102/24'
show
commit
exit
Router2:
configure
set interfaces ethernet eth1 address '10.10.1.6/30'
set interfaces ethernet eth2 address '10.10.1.9/30'
set interfaces ethernet eth3 address '172.16.1.1/16'
show
commit
exit
Router3:
configure
set interfaces ethernet eth1 address '10.10.1.2/30'
set interfaces ethernet eth2 address '10.10.1.10/30'
set interfaces ethernet eth3 address '192.168.1.1/24'
show
commit
exit
OSPF
Ada tiga (3) elemen dasar konfigurasi OSPF:
- Enable OSPF instance
- OSPF area configuration
- OSPF network configuration
instance name=default sudah ada, tidak perlu di tambahkan, tapi kalau perlu menambahkan caranya adalah sebagai berikut Catatan: Ingat bahwa backbone area-id adalah 0.0.0.0.
R1:
configure
set protocols ospf area 0 network 10.10.1.0/30
set protocols ospf area 0 network 10.10.1.4/30
set protocols ospf log-adjacency-changes
set protocols ospf parameters router-id 10.10.1.1
show
show protocols
commit
exit
R2:
configure
set protocols ospf area 0 network 10.10.1.4/30
set protocols ospf area 0 network 10.10.1.8/30
set protocols ospf area 0 network 172.16.0.0/16
set protocols ospf log-adjacency-changes
set protocols ospf parameters router-id 10.10.1.6
show
show protocols
commit
exit
R3:
configure
set protocols ospf area 0 network 10.10.1.0/30
set protocols ospf area 0 network 10.10.1.8/30
set protocols ospf area 0 network 192.168.1.0/24
set protocols ospf log-adjacency-changes
set protocols ospf parameters router-id 10.10.1.2
show
show protocols
commit
exit
Verify
Cek R1, R2, R3
show ip ospf database
show ip ospf neighbor
show ip ospf route
show ip route
Referensi
Pranala Menarik
