VoIP Cookbook: Using the SPA400 with Asterisk
Steps that need to be carried out to link SPA400 to Asterisk are as follows:
- Configuring the SPA400 IP address
- Configuring SPA400 IP address
- Configuring Asterisk account in SPA400
- Configuring sip.conf in Asterisk to have it registered to SPA400
- Conguring extensions.conf in Asterisk so it dial out using SPA400
Making all these configurations is not difficult and can be done through the web. The default username is Admin (Case sensitive) without a password.
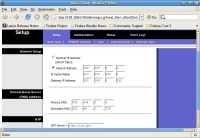
To configure the IP address of SPA 400, click Setup and under this tab, click Basic Setup. Do not use Dynamic IP Address, since Asterisk needs to seek SPA400 and register itself to SPA400. Instead, choose Fixed IP Address. If necessary, we can also set the DNS and NTP server we often use. Obtain the information on DNS server from your internet service provider. For NTP server, type in time.nist.gov or pool.ntp.org. After all configuration is completed, click Save Settings.
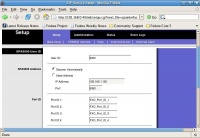
Next, configure the account so either Asterisk or SPA9000 will be able to log into SPA400. The way to do this is to go into the Setup menu and click SPA9000 Interface. Change the user ID to the username we use to log in. Here we use “9000” as an example. Then choose Discover Automatically. Provided this setting works properly, you may want to change this setting in order to have a more secure connectivity, by setting the values of Asterisk server to match those of SPA400 server. Once everything is completed, click Save Settings to save the configuration.

