Arduino: Switch Case
Sumber: https://docs.arduino.cc/built-in-examples/control-structures/SwitchCase
Pernyataan if memungkinkan kita untuk memilih di antara dua opsi terpisah, TRUE atau FALSE. Bila ada lebih dari dua opsi, kita dapat menggunakan beberapa pernyataan if, atau kita dapat menggunakan pernyataan switch. Switch memungkinkan kita untuk memilih di antara beberapa opsi diskrit. Tutorial ini menunjukkan cara menggunakannya untuk beralih di antara empat status resistor foto yang diinginkan: really dark, dim, medium, dan bright.
Program ini pertama membaca fotoresistor. Kemudian ia menggunakan fungsi map() untuk memetakan outputnya ke salah satu dari empat nilai: 0, 1, 2, atau 3. Terakhir, ia menggunakan pernyataan switch() untuk mencetak satu dari empat pesan kembali ke komputer tergantung pada yang mana dari empat nilai dikembalikan.
Hardware Required
- Arduino Board
- photoresistor, or another analog sensor
- 10k ohm resistors
- hook-up wires
- breadboard
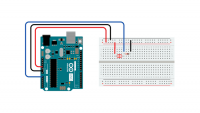
Circuit
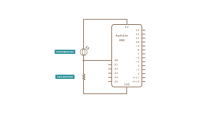
Fotoresistor dihubungkan ke analog di pin 0 menggunakan rangkaian pembagi tegangan. Sebuah resistor 10K ohm membentuk sisi lain dari pembagi tegangan, berjalan dari Analog di 0 ke ground. Fungsi analogRead() mengembalikan kisaran sekitar 0 hingga 600 dari sirkuit ini di ruang dalam ruangan yang cukup terang.
Schematic
Code
/*
  Switch statement

  Demonstrates the use of a switch statement. The switch statement allows you
  to choose from among a set of discrete values of a variable. It's like a
  series of if statements.

  To see this sketch in action, put the board and sensor in a well-lit room,
  open the Serial Monitor, and move your hand gradually down over the sensor.

  The circuit:
  - photoresistor from analog in 0 to +5V
  - 10K resistor from analog in 0 to ground

  created 1 Jul 2009
  modified 9 Apr 2012
  by Tom Igoe

  This example code is in the public domain.

  https://www.arduino.cc/en/Tutorial/BuiltInExamples/SwitchCase
*/

// these constants won't change. They are the lowest and highest readings you
// get from your sensor:
const int sensorMin = 0;      // sensor minimum, discovered through experiment
const int sensorMax = 600;    // sensor maximum, discovered through experiment

void setup() {
  // initialize serial communication:
  Serial.begin(9600);
}

void loop() {
  // read the sensor:
  int sensorReading = analogRead(A0);
  // map the sensor range to a range of four options:
  int range = map(sensorReading, sensorMin, sensorMax, 0, 3);

  // do something different depending on the range value:
  switch (range) {
    case 0:    // your hand is on the sensor
      Serial.println("dark");
      break;
    case 1:    // your hand is close to the sensor
      Serial.println("dim");
      break;
    case 2:    // your hand is a few inches from the sensor
      Serial.println("medium");
      break;
    case 3:    // your hand is nowhere near the sensor
      Serial.println("bright");
      break;
  }
  delay(1);        // delay in between reads for stability
}

