Arduino: State Change Detection
Jump to navigation
Jump to search
Sumber: https://www.arduino.cc/en/Tutorial/StateChangeDetection
Once you've got a pushbutton working, you often want to do some action based on how many times the button is pushed. To do this, you need to know when the button changes state from off to on, and count how many times this change of state happens. This is called state change detection or edge detection. In this tutorial we learn how to check the state change, we send a message to the Serial Monitor with the relevant information and we count four state changes to turn on and off an LED.
Hardware Required
- Arduino or Genuino Board
- momentary button or switch
- 10k ohm resistor
- hook-up wires
- breadboard
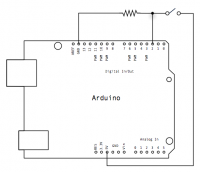
Rangkaian
Code
/*
  State change detection (edge detection)

 Often, you don't need to know the state of a digital input all the time,
 but you just need to know when the input changes from one state to another.
 For example, you want to know when a button goes from OFF to ON.  This is called
 state change detection, or edge detection.

 This example shows how to detect when a button or button changes from off to on
 and on to off.

 The circuit:
 * pushbutton attached to pin 2 from +5V
 * 10K resistor attached to pin 2 from ground
 * LED attached from pin 13 to ground (or use the built-in LED on
   most Arduino boards)

 created  27 Sep 2005
 modified 30 Aug 2011
 by Tom Igoe

This example code is in the public domain.

 http://www.arduino.cc/en/Tutorial/ButtonStateChange

 */

// this constant won't change:
const int  buttonPin = 2;    // the pin that the pushbutton is attached to
const int ledPin = 13;       // the pin that the LED is attached to

// Variables will change:
int buttonPushCounter = 0;   // counter for the number of button presses
int buttonState = 0;         // current state of the button
int lastButtonState = 0;     // previous state of the button

void setup() {
  // initialize the button pin as a input:
  pinMode(buttonPin, INPUT);
  // initialize the LED as an output:
  pinMode(ledPin, OUTPUT);
  // initialize serial communication:
  Serial.begin(9600);
}


void loop() {
  // read the pushbutton input pin:
  buttonState = digitalRead(buttonPin);

  // compare the buttonState to its previous state
  if (buttonState != lastButtonState) {
    // if the state has changed, increment the counter
    if (buttonState == HIGH) {
      // if the current state is HIGH then the button
      // wend from off to on:
      buttonPushCounter++;
      Serial.println("on");
      Serial.print("number of button pushes:  ");
      Serial.println(buttonPushCounter);
    } else {
      // if the current state is LOW then the button
      // wend from on to off:
      Serial.println("off");
    }
    // Delay a little bit to avoid bouncing
    delay(50);
  }
  // save the current state as the last state,
  //for next time through the loop
  lastButtonState = buttonState;


  // turns on the LED every four button pushes by
  // checking the modulo of the button push counter.
  // the modulo function gives you the remainder of
  // the division of two numbers:
  if (buttonPushCounter % 4 == 0) {
    digitalWrite(ledPin, HIGH);
  } else {
    digitalWrite(ledPin, LOW);
  }

}

