Difference between revisions of "Penggunaan Unetbootin"
Jump to navigation
Jump to search
Onnowpurbo (talk | contribs) |
Onnowpurbo (talk | contribs) |
||
| (12 intermediate revisions by the same user not shown) | |||
| Line 1: | Line 1: | ||
| − | + | [[UNetbootin]] sangat bermanfaat untuk membuat [[LiveUSB]] dari sebuah file [[iso]] [[Linux]]. | |
| − | |||
| − | |||
| − | |||
| − | |||
| − | |||
==Download== | ==Download== | ||
Download UNetbootin dari: | Download UNetbootin dari: | ||
| − | * http://unetbootin.sourceforge.net/ | + | * http://unetbootin.sourceforge.net |
| + | * https://launchpad.net/~gezakovacs/+archive/ppa/+sourcepub/1123137/+listing-archive-extra | ||
| + | * http://sourceforge.net/project/showfiles.php?group_id=222386 | ||
| − | == | + | ==Instalasi UNetbootin== |
| − | |||
| − | |||
| − | + | Misalnya kita menggunakan [[Ubuntu]] Lucid 10.04 | |
| − | + | # apt-get install p7zip-full syslinux | |
| + | # dpkg -i /home/library/library/library-sw-hw/linux-1/unetbootin/unetbootin_442-1~lucid1_i386.deb | ||
| − | + | ==Menjalankan UNetbootin== | |
| − | + | Klik | |
| − | |||
| − | + | Applications -> System Tools -> UNetbootin | |
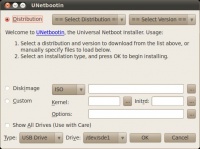
| − | + | [[Image:Unetbootin1.jpeg|center|200px|thumb|tampilan awal, kita dapat memilih file iso yang ingin di jadikan liveusb]] | |
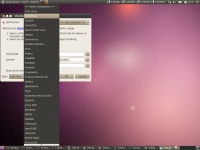
| − | + | [[Image:Unetbootin2.jpeg|center|200px|thumb|pada bagian pemilihan distro cukup banyak distro yang di dukung]] | |
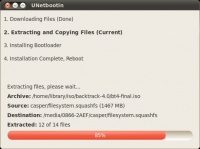
| − | + | [[Image:Unetbootin3.jpeg|center|200px|thumb]] | |
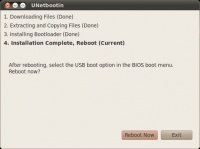
| − | + | [[Image:Unetbootin4.jpeg|center|200px|thumb|selesai sudah proses pembuatan LiveUSB]] | |
| − | + | ==Referensi== | |
| − | + | * http://unetbootin.sourceforge.net/#other | |
| − | + | * http://sourceforge.net/apps/trac/unetbootin/wiki | |
| − | + | * http://www.ubuntu-eee.com/index.php5?title=Get_Ubuntu_Eee | |
| + | * http://sourceforge.net/apps/trac/unetbootin/wiki/commands | ||
| + | * http://www.backtrack-linux.org/wiki/index.php/UNetbootin_USB_Installer | ||
| − | + | ==Pranala Menarik== | |
| − | + | * [[LiveUSB]] | |
| + | * [[Membuat Installer Ubuntu di USB FlashDisk menjadi LiveUSB]] | ||
| + | * [[Membuat Installer LiveUSB Ubuntu menggunakan livecd-iso-to-disk]] | ||
| + | * [[Membuat Installer LiveUSB menggunakan perintah dd]] | ||
| + | * [[Penggunaan Unetbootin]] | ||
| + | * [[Proxmox 2.2: Membuat LiveUSB]] | ||
| − | |||
| − | |||
| − | + | [[Category: Linux]] | |
| − | |||
| − | |||
| − | |||
| − | |||
| − | |||
| − | |||
Latest revision as of 08:24, 5 March 2013
UNetbootin sangat bermanfaat untuk membuat LiveUSB dari sebuah file iso Linux.
Download
Download UNetbootin dari:
- http://unetbootin.sourceforge.net
- https://launchpad.net/~gezakovacs/+archive/ppa/+sourcepub/1123137/+listing-archive-extra
- http://sourceforge.net/project/showfiles.php?group_id=222386
Instalasi UNetbootin
Misalnya kita menggunakan Ubuntu Lucid 10.04
# apt-get install p7zip-full syslinux
# dpkg -i /home/library/library/library-sw-hw/linux-1/unetbootin/unetbootin_442-1~lucid1_i386.deb
Menjalankan UNetbootin
Klik
Applications -> System Tools -> UNetbootin
Referensi
- http://unetbootin.sourceforge.net/#other
- http://sourceforge.net/apps/trac/unetbootin/wiki
- http://www.ubuntu-eee.com/index.php5?title=Get_Ubuntu_Eee
- http://sourceforge.net/apps/trac/unetbootin/wiki/commands
- http://www.backtrack-linux.org/wiki/index.php/UNetbootin_USB_Installer


