Difference between revisions of "Burp Suite: Tutorial 1"
Onnowpurbo (talk | contribs) |
Onnowpurbo (talk | contribs) |
||
| Line 22: | Line 22: | ||
[[File:2-switchysharp-proxy-addon.png|center|300px|thumb|Burp Suite Tutorial - SwitchySharp Proxy Settings]] | [[File:2-switchysharp-proxy-addon.png|center|300px|thumb|Burp Suite Tutorial - SwitchySharp Proxy Settings]] | ||
| − | == | + | ==Konfigurasi POrilaku Intercept== |
| − | + | Hal berikutnya yang saya lakukan adalah mengkonfigurasi fitur proxy intercept. Set hanya untuk pause pada request dan responds ke dan dari situs target saja. Navigate ke tab "Proxy" di bawah sub-tab "Options". Heading kedua dan ketiga menampilkan opsi yang dapat dikonfigurasi untuk intercepting request dan respons. Hapus Burp Suite default dan check “URL Is in target scope”. Selanjutnya intercept off karena tidak diperlukan untuk awal walkthrough kita. Dari subtab “Intercept” pastikan bahwa tombol sakelar tertulis “Intercept off” | |
[[File:3-proxy-intercept-settings.png|center|300px|thumb|Burp Suite Tutorial - Proxy Intercept Settings]] | [[File:3-proxy-intercept-settings.png|center|300px|thumb|Burp Suite Tutorial - Proxy Intercept Settings]] | ||
| − | |||
==Application Walkthrough – Burp Suite Tutorial== | ==Application Walkthrough – Burp Suite Tutorial== | ||
Revision as of 09:39, 13 February 2020
Sumber: https://www.pentestgeek.com/web-applications/burp-suite-tutorial-1
Burp Suite dari Portswigger adalah salah satu tool favorot untuk melakukan Web Penetration Test. Berikut adalah langkah-langkah yang bisa dilakukan menggunakan Burp Suite.
Configure Outbound SOCKS Proxy
Bergantung pada scope yang ingin kita lakukan, mungkin perlu untuk mengarahkan traffic Burp Suite agar melalui Outbound SOCKS Proxy. Ini memastikan bahwa traffic pengujian berasal dari lingkungan pengujian yang disetujui. Yang lebih baik adalah menggunakan koneksi SSH sederhana untuk tujuan ini. SSH out ke server pengujian kita dan mengatur Proxy SOCKS di localhost melalui opsi ‘–D’ seperti ini.
ssh –D 9292 –l username servername
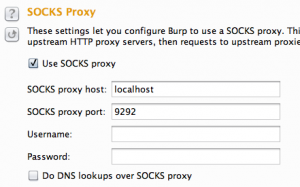
Arahkan ke tab Opsi yang terletak di ujung kanan menu paling atas di Burp Suite. Pada sub-tab "Connections", scroll ke bawah ke bagian ketiga berlabel "SOCKS Proxy". Ketik localhost untuk opsi host dan 9292 untuk opsi port.
Sekarang Burp Suite dikonfigurasi untuk mengarahkan traffic melalui outbound SSH tunnel. Konfigurasikan pengaturan proxy browser kita untuk menggunakan Burp Suite. Arahkan ke www.whatismyip.com dan pastikan alamat IP kita berasal dari lingkungan pengujian kita.
- Tip Sebaiknya menggunakan browser terpisah untuk pengujian aplikasi web. Ini memastikan anda tidak akan secara sengaja mengirimkan data pribadi ke salah satu situs klien anda seperti kata sandi ke akun gmail misalnya.
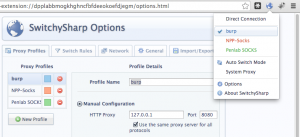
Untuk memudahkan akan lebih baik menambahkan addon switching proxy seperti "SwitchySharp" untuk Google Chrome. Ini memungkinkan kita untuk dengan mudah berpindah-pindah antar berbagai konfigurasi proxy yang mungkin kita perlukan untuk engagement yang berbeda. Berikut adalah pengaturan konfigurasi untuk Burp Suite.
Konfigurasi POrilaku Intercept
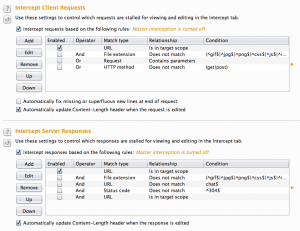
Hal berikutnya yang saya lakukan adalah mengkonfigurasi fitur proxy intercept. Set hanya untuk pause pada request dan responds ke dan dari situs target saja. Navigate ke tab "Proxy" di bawah sub-tab "Options". Heading kedua dan ketiga menampilkan opsi yang dapat dikonfigurasi untuk intercepting request dan respons. Hapus Burp Suite default dan check “URL Is in target scope”. Selanjutnya intercept off karena tidak diperlukan untuk awal walkthrough kita. Dari subtab “Intercept” pastikan bahwa tombol sakelar tertulis “Intercept off”
Application Walkthrough – Burp Suite Tutorial
For some reason, a lot of people like to skip this step. I don’t recommend this. During the initial walkthrough of your target application it is important to manually click through as much of the site as possible. Try and resist the urge to start analyzing things in Burp Suite right a way. Instead, spend a good while and click on every link and view every page. Just like a normal user might do. Think about how the site works or how it’s “supposed” to work.
You should be thinking about the following questions:
   What types of actions can someone do, both from an authenticated and unauthenticated perspective?
   Do any requests appear to be processed by a server-side job or database operation?
   Is there any information being displayed that I can control
If you stumble upon any input forms, be sure to do some manual test cases. Entering a single tick and hit submit on any Search form or zip code field you come across. You might be surprised at how often security vulnerabilities are discovered by curious exploration and not by automated scanning.
Configure Your Target Scope – Burp Suite Tutorial
Now that you have a good feel for how your target application works its time to start analyzing some GETs and Posts. However, before doing any testing with Burp Suite it’s a good idea to properly define your target scope. This will ensure that you don’t send any potentially malicious traffic to websites that you are not authorized to test.
- ProTip I am authorized to test www.pentestgeek.com. *You* are not.
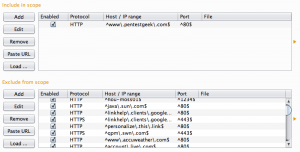
Head over to the “Target” tab and then the “Site map” sub-tab. Select your target website from the left display pane. Right click and choose “Add to scope’. Next highlight all other sites in the display pane, right click and select Remove from scope. If you’ve done this correctly your Burp Suite scope tab should look something like the image below.
Initial Pilfering – Burp Suite Tutorial
Click on the “Target” tab and the “Site Map” sub tab. Scroll down to the appropriate site branch and expand all the arrows until you get a complete picture of your target site. This should include all of the individual pages you browsed as well as any javascript and css files. Take a moment to soak all of this in, try and spot files that you don’t recognize from the manual walkthrough. You can use Burp Suite to view the response of each request in a number of different formats located on the “Resposne” tab of the bottom right display pane. Browse through each respond searching for interesting gems. Things you might be surprised to find include:
   Developer comments
   Email addresses
   Usernames & passwords if you’re lucky
   Path disclosure to other files/directories
   Etc…
Search Specific Keywords – Burp Suite Tutorial
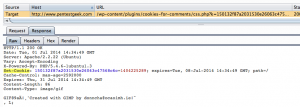
You can also leverage Burp Suite to do some of the heavy lifting for you. Right click on a node, from the “Engagement tools” sub-menu select “Search”. One of my favorite searches is to scan for the string “set-cookie”. This lets you know which pages are interesting enough to require a unique cookie. Cookies are commonly used by web application developers to differentiate between requests from multiple site users. This ensures that user ‘A’ doesn’t get to view the information belonging to user ‘B’. For this reason it is a good idea to identify these pages and pay special attention to them.
Using Spider and Discover – Burp Suite Tutorial
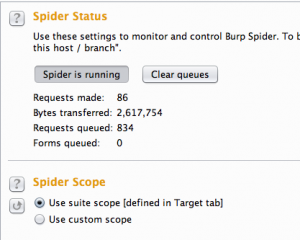
After a good bit of manual poking and prodding it’s usually beneficial to allow Burp Suite to spider the host. Just right click on the target’s root branch in the sitemap and select “Spider this host”.
Once the spider has finished, go back to your site-map and see if you picked up any new pages. If you have, take a manual look at them in your browser and also within Burp Suite to see if they produce anything interesting. Are there any new login prompts, or input boxes for example? If you’re still not satisfied with all that you have found you can try Burp Suite’s discovery module. Right click on the target site’s root branch and from the “Engagement tools” sub-menu select “Discover Content”. On most sites this module can and will run for a long time so it’s a good practice to keep an eye on it. Make sure that it completes or shut it off manually before it runs for too long.
Using The Repeater – Burp Suite Tutorial
The Repeater tab is arguably one of the most useful features in Burp Suite. I use it hundreds of times on every web application that I test. It is extremely valuable and also incredibly simple to use. Just right click on any request within the “Target” or “Proxy” tab and select “Send to Repeater”. Next click over to the “Repeater” tab and hit “Go”. You will see something like this.
Here you can use burp suite to manipulate any part of the HTTP request headers and see what the response looks like. I recommend spending some good time here playing with every aspect of the HTTP request. Especial any GET/POST parameters that are besting sent along with the request.
Using The Intruder – Burp Suite Tutorial
If you are limited on time and have too many requests and individual parameters to do a thorough manual test. The Burp Suite Intruder is a really great and powerful way to perform automated and semi-targeted fuzzing. You can use it against one or more parameters in an HTTP request. Right click on any request just as we did before and this time select “Send to Intruder”. Head over to the “Intruder” tab and click on the “Positions” sub-tab. You should see something like this.
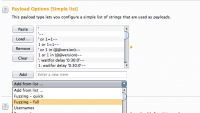
I recommend using the “Clear” button to remove what is selected at first. The default behavior is to test everything with an ‘=’ sign. Highlight the parameters you wan’t to fuzz and click “Add”. Next you need to go to the “Payloads” sub-tab and tell Burp Suite which test cases to perform during the fuzzing run. A good one to start off with is “Fuzzing – full”. this will send a number of basic test cases to every parameter that you highlighted on the “Positions” sub-tab.
Automated Scanning – Burp Suite Tutorial
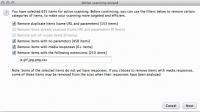
The last thing that I do when testing a web application is perform an automated scan using Burp Suite. Back on your “Site map” sub-tab, right click on the root branch of your target site and select “Passively scan this host”. This will analyze every request and response that you have generated during your Burp Suite session. It will produce a vulnerability advisor on the “Results” sub-tab located on the “Scanner” tab. I like to do the passive scan first because it doesn’t send any traffic to the target server. Alternatively you can configure Burp Suite to passively analyze requests and responses automatically in the “Live scanning” sub-tab. You can also do this for Active Scanning but I do not recommend it.
When doing an active scan I like to use the following settings.
End Of Part1 – Burp Suite Tutorial
Hopefully you’ve learned some useful techniques for performing Web Penetration Testing. In Part 2, we will go over some more of Burp Suite’s features. We will cover reporting and exporting session data for collaboration with other pentesters. I look forward to seeing you there. Thank you for reading and as always, Hack responsibly.
