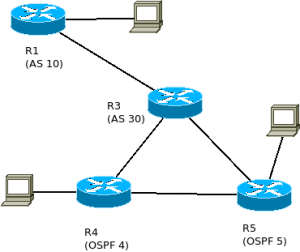
Mikrotik: BGP 2 BGP redistribute 2 OSPF
Ada tiga (3) ISP
ISP1:
IP 192.168.1.1/24 menuju ISP3
IP 192.168.3.1/24 menuju ISP2
AS 10
IP 10.100.100.0/24
IP 10.100.200.0/24
ISP3 (kita)
IP 192.168.1.2/24 - menuju ISP1
IP 192.168.2.2/24 - menuju ISP2
AS 30
IP 10.1.1.0/24
IP 10.1.2.0/24
R4
IP 10.1.1.2/24 menuju ISP3
IP 172.16.1.1  menuju R5
IP 172.16.10.1 LAN
IP 172.16.20.1 LAN
R5
IP 10.1.2.2/24 menuju ISP3
IP 172.16.1.2  menuju R4
IP 172.16.100.1/24 LAN
IP 172.16.200.1/24 LAN
Sambungan Fisik
ISP1
ISP1 Eth1/0 -> ISP3 Eth1/0
ISP1 Eth1/1 -> ISP2 Eth1/1
ISP2 Eth1/0 -> ISP3 Eth1/1

ISP1 Eth1/2 10.100.100.1/24
ISP1 Eth1/3 10.100.200.1/24

ISP2 Eth1/2 10.10.10.1/24
ISP2 Eth1/3 10.10.20.1/24

ISP3 Eth1/2 10.1.1.1/24
ISP3 Eth1/3 10.1.2.1/24
Setup connection
ISP1
/ip address add address=192.168.1.1/24 interface=ether1
/ip address add address=192.168.3.1/24 interface=ether2
/ip address add address=10.100.100.1/24 interface=ether3
/ip address add address=10.100.200.1/24 interface=ether4
ISP3
/ip address add interface=ether1 address=192.168.1.2/24
/ip address add interface=ether2 address=192.168.2.2/24
/ip address add interface=ether3 address=10.1.1.1/24
/ip address add interface=ether4 address=10.1.2.1/24
R4
/ip address add interface=ether1 address=10.1.1.2/24
/ip address add interface=ether2 address=172.16.1.1/24
/ip address add interface=ether3 address=172.16.10.1/24
/ip address add interface=ether4 address=172.16.20.1/24
R5
/ip address add interface=ether1 address=10.1.2.2/24
/ip address add interface=ether2 address=172.16.1.2/24
/ip address add interface=ether3 address=172.16.100.1/24
/ip address add interface=ether4 address=172.16.200.1/24
BGP Peering
Consider that IP connectivity between ISPs edge routers and Our Core router is already set up and working properly. So we can start to establish BGP peering to both ISPs.
ISP1:
#set our AS number
/routing bgp instance set default as=10
#add BGP peers
/routing bgp peer
add name=toISP3 remote-address=192.168.1.2 remote-as=30
# jika ingin redistribute default route ke client yang spesifik
# add name=toISP2 remote-address=192.168.3.2 remote-as=20 default-originate=if-installed
# add name=toISP3 remote-address=192.168.1.2 remote-as=30 default-originate=if-installed
#
# advertize routing
#
/routing bgp network
add network=10.100.100.0/24 synchronize=no
add network=10.100.200.0/24 synchronize=no
Main / Backup Link Setup di ISP3
Lakukan
- accept network kita sendiri
- drop semua tabel IP lainnya, karena kita tidak mau menjadi transit provider
- BGP AS prepend - menaikan AS path ke salah satu ISP (disini ISP1)
ISP3:
enable
configure terminal
  router bgp 30
  bgp router-id 192.168.1.2
    no synchronization
    bgp log-neighbor-changes
    network 10.1.1.0 mask 255.255.255.0
    network 10.1.2.0 mask 255.255.255.0
    neighbor 192.168.1.1 remote-as 10
    redistribute ospf 3 metric 100
  end
OSPF
ISP3
enable
configure terminal
 !
 ! area 0 = backbone
 router ospf 3
 network 10.1.1.0 0.0.0.255 area 0.0.0.0
 network 10.1.2.0 0.0.0.255 area 0.0.0.0
 end
R4
enable
configure terminal
 !
 ! area 0 = backbone
 router ospf 4
 network 10.1.1.0 0.0.0.255 area 0.0.0.0
 network 172.16.1.0 0.0.0.255 area 0.0.0.0
 network 172.16.10.0 0.0.0.255 area 0.0.0.0
 network 172.16.20.0 0.0.0.255 area 0.0.0.0
 end
R5
enable
configure terminal
  !
  ! area 0 = backbone
  router ospf 5
  network 10.1.2.0 0.0.0.255 area 0.0.0.0
  network 172.16.1.0 0.0.0.255 area 0.0.0.0
  network 172.16.100.0 0.0.0.255 area 0.0.0.0
  network 172.16.200.0 0.0.0.255 area 0.0.0.0
  end
Cek
/routing filter print
/routing bgp instance print
/routing bgp peer print status
/routing bgp peer print
/routing bgp advertisements print
/ip route print
Referensi
- https://www.cisco.com/c/en/us/td/docs/ios-xml/ios/iproute_bgp/configuration/xe-16/irg-xe-16-book/configuring-a-basic-bgp-network.html
- https://wiki.mikrotik.com/wiki/Manual:Simple_BGP_Multihoming
