JAVA: Main thread di Java
Java menyediakan dukungan bawaan untuk pemrograman multithread. Program multithread berisi dua atau lebih bagian yang dapat berjalan secara bersamaan. Setiap bagian dari program semacam itu disebut thread, dan setiap thread menentukan jalur eksekusi yang terpisah.
Ketika program Java dijalankan, satu thread segera mulai berjalan. Ini biasanya disebut main thread dari program kita karena ini adalah thread yang dieksekusi ketika program kita dimulai.
Ada properti tertentu yang terkait dengan main thread, yaitu sebagai berikut:
- Ini adalah thread dari mana thread "child" lainnya akan muncul.
- Seringkali, itu harus menjadi thread terakhir untuk menyelesaikan eksekusi karena melakukan berbagai tindakan shutdown
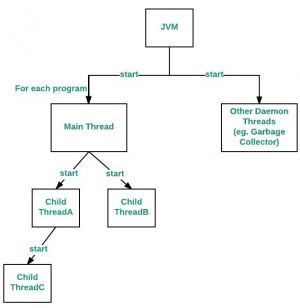
Flow Diagram adalah sebagai berikut:
Cara Mengontrol Main thread
The main thread is created automatically when our program is started. To control it we must obtain a reference to it. This can be done by calling the method currentThread( ) which is present in Thread class. This method returns a reference to the thread on which it is called. The default priority of Main thread is 5 and for all remaining user threads priority will be inherited from parent to child.
Utas utama dibuat secara otomatis ketika program kami dimulai. Untuk mengontrolnya kita harus mendapatkan referensi untuk itu. Ini dapat dilakukan dengan memanggil metode currentThread() yang ada di kelas Thread. Metode ini mengembalikan referensi ke utas yang dipanggil. Prioritas default dari utas Utama adalah 5 dan untuk semua prioritas utas pengguna yang tersisa akan diwarisi dari induk ke anak.
Contoh
// Java program to control the Main Thread

// Importing required classes
import java.io.*;
import java.util.*;

// Class 1
// Main class extending thread class
public class Test extends Thread {

    // Main driver method
    public static void main(String[] args)
    {

        // Getting reference to Main thread
        Thread t = Thread.currentThread();

        // Getting name of Main thread
        System.out.println("Current thread: "
                           + t.getName());

        // Changing the name of Main thread
        t.setName("Geeks");
        System.out.println("After name change: "
                           + t.getName());

        // Getting priority of Main thread
        System.out.println("Main thread priority: "
                           + t.getPriority());

        // Setting priority of Main thread to MAX(10)
        t.setPriority(MAX_PRIORITY);

        // Print and display the main thread priority
        System.out.println("Main thread new priority: "
                           + t.getPriority());

        for (int i = 0; i < 5; i++) {
            System.out.println("Main thread");
        }

        // Main thread creating a child thread
        Thread ct = new Thread() {
            // run() method of a thread
            public void run()
            {

                for (int i = 0; i < 5; i++) {
                    System.out.println("Child thread");
                }
            }
        };

        // Getting priority of child thread
        // which will be inherited from Main thread
        // as it is created by Main thread
        System.out.println("Child thread priority: "
                           + ct.getPriority());

        // Setting priority of Main thread to MIN(1)
        ct.setPriority(MIN_PRIORITY);

        System.out.println("Child thread new priority: "
                           + ct.getPriority());

        // Starting child thread
        ct.start();
    }
}

// Class 2
// Helper class extending Thread class
// Child Thread class
class ChildThread extends Thread {

    @Override public void run()
    {

        for (int i = 0; i < 5; i++) {

            // Print statement whenever child thread is
            // called
            System.out.println("Child thread");
        }
    }
}
Output
Current thread: main
After name change: Geeks
Main thread priority: 5
Main thread new priority: 10
Main thread
Main thread
Main thread
Main thread
Main thread
Child thread priority: 10
Child thread new priority: 1
Child thread
Child thread
Child thread
Child thread
Child thread
Now let us discuss the relationship between the main() method and the main thread in Java. For each program, a Main thread is created by JVM(Java Virtual Machine). The “Main” thread first verifies the existence of the main() method, and then it initializes the class. Note that from JDK 6, main() method is mandatory in a standalone java application.
Sekarang mari kita bahas hubungan antara metode main() dan thread utama di Java. Untuk setiap program, utas Utama dibuat oleh JVM (Java Virtual Machine). Utas "Utama" pertama-tama memverifikasi keberadaan metode main(), dan kemudian menginisialisasi kelas. Perhatikan bahwa dari JDK 6, metode main() adalah wajib dalam aplikasi java mandiri.
Deadlocking with use of Main Thread(only single thread)
We can create a deadlock by just using the Main thread, i.e. by just using a single thread.
Kita dapat membuat kebuntuan hanya dengan menggunakan utas Utama, yaitu dengan hanya menggunakan satu utas.
Contoh
// Java program to demonstrate deadlock
// using Main thread

// Main class
public class GFG {

  // Main driver method
  public static void main(String[] args) {

    // Try block to check for exceptions
    try {

      // Print statement
      System.out.println("Entering into Deadlock");

      // Joining the current thread
      Thread.currentThread().join();

      // This statement will never execute
      System.out.println("This statement will never execute");
    }

    // Catch block to handle the exceptions
    catch (InterruptedException e) {

      // Display the exception along with line number
      // using printStackTrace() method
      e.printStackTrace();
    }
  }
}
Output:
Output explanation:
The statement “Thread.currentThread().join()”, will tell Main thread to wait for this thread(i.e. wait for itself) to die. Thus Main thread wait for itself to die, which is nothing but a deadlock.
Pernyataan "Thread.currentThread().join()", akan memberi tahu utas Utama untuk menunggu utas ini (yaitu menunggu dirinya sendiri) mati. Jadi utas Utama menunggu dirinya sendiri untuk mati, yang tidak lain adalah jalan buntu.
