ANDROID: Activities
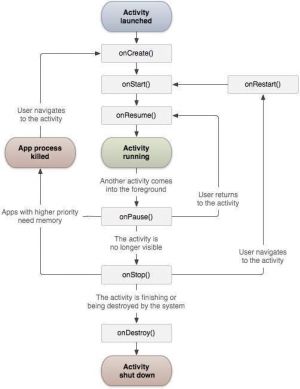
Jika kita pernah menggunakan bahasa pemrograman C, C++ atau Java maka kita biasanya akan tahu bahwa program kita dimulai dengan fungsi main(). Cara yang sangat mirip, Android memulai programnya dengan dalam Activity yang dimulai dengan panggilan pada callback method onCreate(). Ada urutan method callback yang memulai activity dan urutan method callback yang meruntuhkan activity seperti yang ditunjukkan pada diagram life cycle activity di bawah ini.
Android Activity lifecycle
Activity class mendefinisikan call back - event. Kita tidak perlu menerapkan semua method callback. Namun, penting bagi kita untuk memahami masing-masing dan menerapkannya yang memastikan aplikasi berperilaku seperti yang diharapkan pengguna.
| Sr.No | Callback | Description |
|---|---|---|
| 1 | onCreate() | This is the first callback and called when the activity is first created. |
| 2 | onStart() | This callback is called when the activity becomes visible to the user. |
| 3 | onResume() | This is called when the user starts interacting with the application. |
| 4 | onPause() | The paused activity does not receive user input and cannot execute any code and called when the current activity is being paused and the previous activity is being resumed. |
| 5 | onStop() | This callback is called when the activity is no longer visible. |
| 6 | onDestroy() | This callback is called before the activity is destroyed by the system. |
| 7 | onRestart() | This callback is called when the activity restarts after stopping it. |
Contoh
Contoh ini akan membawa kita melalui langkah-langkah sederhana untuk menunjukkan life cycle activity pada aplikasi Android. Ikuti langkah-langkah berikut untuk memodifikasi aplikasi Android yang kita buat di contoh aplikasi Hello World
| Step | Description |
|---|---|
| 1 | You will use Android studio to create an Android application and name it as HelloWorld under a package com.example.helloworld as explained in the Hello World Example chapter. |
| 2 | Modify main activity file MainActivity.java as explained below. Keep rest of the files unchanged. |
| 3 | Run the application to launch Android emulator and verify the result of the changes done in the application. |
Berikut adalah konten dari file activity main yang dimodifikasi src/com.example.helloworld/MainActivity.java. File ini mencakup setiap method life cycle dasar. Metode Log.d() telah digunakan untuk menghasilkan log message
package com.example.helloworld;

import android.os.Bundle;
import android.app.Activity;
import android.util.Log;

public class MainActivity extends Activity {
    String msg = "Android : ";

   /** Called when the activity is first created. */
   @Override
   public void onCreate(Bundle savedInstanceState) {
      super.onCreate(savedInstanceState);
      setContentView(R.layout.activity_main);
      Log.d(msg, "The onCreate() event");
   }

   /** Called when the activity is about to become visible. */
   @Override
   protected void onStart() {
      super.onStart();
      Log.d(msg, "The onStart() event");
   }

   /** Called when the activity has become visible. */
   @Override
   protected void onResume() {
      super.onResume();
      Log.d(msg, "The onResume() event");
   }

   /** Called when another activity is taking focus. */
   @Override
   protected void onPause() {
      super.onPause();
      Log.d(msg, "The onPause() event");
   }

   /** Called when the activity is no longer visible. */
   @Override
   protected void onStop() {
      super.onStop();
      Log.d(msg, "The onStop() event");
   }

   /** Called just before the activity is destroyed. */
   @Override
   public void onDestroy() {
      super.onDestroy();
      Log.d(msg, "The onDestroy() event");
   }
}
Activity class memuat semua komponen UI menggunakan file XML yang tersedia di folder res/layout proyek. Pernyataan berikut memuat komponen UI dari file res/layout/activity_main.xml:
setContentView(R.layout.activity_main);
Aplikasi dapat memiliki satu atau lebih activity tanpa batasan apa pun. Setiap activity yang kita tetapkan untuk aplikasi harus dideklarasikan dalam file AndroidManifest.xml dan aktivitas utama untuk aplikasi Anda harus dideklarasikan dalam manifes dengan <intent-filter> yang menyertakan tindakan MAIN dan kategori LAUNCHER sebagai berikut:
<?xml version="1.0" encoding="utf-8"?>
<manifest xmlns:android="http://schemas.android.com/apk/res/android"
    package="com.example.tutorialspoint7.myapplication">

    <application
        android:allowBackup="true"
        android:icon="@mipmap/ic_launcher"
        android:label="@string/app_name"
        android:supportsRtl="true"
        android:theme="@style/AppTheme">
        <activity android:name=".MainActivity">
            <intent-filter>
                <action android:name="android.intent.action.MAIN" />

                <category android:name="android.intent.category.LAUNCHER" />
            </intent-filter>
        </activity>
    </application>
</manifest>
Jika salah satu tindakan MAIN atau kategori LAUNCHER tidak dideklarasikan untuk salah satu activity, maka ikon aplikasi kita tidak akan muncul di daftar aplikasi layar Utama.
Mari kita coba menjalankan Hello World yang telah dimodifikasi! aplikasi yang baru saja kita modifikasi. Asumsinya kita telah membuat AVD saat melakukan setup environment. Untuk menjalankan aplikasi dari Android studio, buka salah satu file activity proyek dan klik icon Run Eclipse Run Icon dari toolbar. Android studio menginstal aplikasi pada AVD dan memulainya dan jika semuanya baik-baik saja dengan pengaturan dan aplikasi kita, itu akan menampilkan jendela Emulator dan kita akan melihat pesan log berikut di jendela LogCat di Android studio
08-23 10:32:07.682 4480-4480/com.example.helloworld D/Android :: The onCreate() event
08-23 10:32:07.683 4480-4480/com.example.helloworld D/Android :: The onStart() event
08-23 10:32:07.685 4480-4480/com.example.helloworld D/Android :: The onResume() event
Android LotCat Window
Mari kita coba klik tombol lock screen pada emulator Android dan dia akan menghasilkan event messafe berikut di LogCat window di Android Studio:
08-23 10:32:53.230 4480-4480/com.example.helloworld D/Android :: The onPause() event
08-23 10:32:53.294 4480-4480/com.example.helloworld D/Android :: The onStop() event
Mari kita coba lagi untuk unlock screen anda di emulator Android dan dia akan menghasilkan event message berikut di LogCat window di Android Studio:
08-23 10:34:41.390 4480-4480/com.example.helloworld D/Android :: The onStart() event
08-23 10:34:41.392 4480-4480/com.example.helloworld D/Android :: The onResume() event
Selanjutnya, mari kita coba lagi mengklik Android Back Button pada emulator Android dan dia akan menghasilkan event message berikut di LogCat window di studio Android dan ini melengkapi Activity Life Cycle untuk Aplikasi Android.
08-23 10:37:24.806 4480-4480/com.example.helloworld D/Android :: The onPause() event
08-23 10:37:25.668 4480-4480/com.example.helloworld D/Android :: The onStop() event
08-23 10:37:25.669 4480-4480/com.example.helloworld D/Android :: The onDestroy() event
