Arduino: Digital Input Pullup
Sumber: https://www.arduino.cc/en/Tutorial/InputPullupSerial
This example demonstrates the use of INPUT_PULLUP with pinMode(). It monitors the state of a switch by establishing serial communication between your Arduino and your computer over USB.
Additionally, when the input is HIGH, the onboard LED attached to pin 13 will turn on; when LOW, the LED will turn off.
Hardware Required
- Arduino Board
- A momentary switch, button, or toggle switch
- breadboard
- hook-up wire
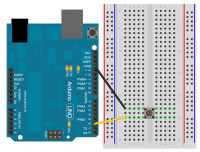
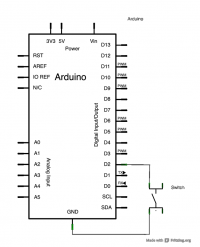
Rangkaian
Code
/*
 Input Pullup Serial

 This example demonstrates the use of pinMode(INPUT_PULLUP). It reads a
 digital input on pin 2 and prints the results to the serial monitor.

 The circuit:
 * Momentary switch attached from pin 2 to ground
 * Built-in LED on pin 13

 Unlike pinMode(INPUT), there is no pull-down resistor necessary. An internal
 20K-ohm resistor is pulled to 5V. This configuration causes the input to
 read HIGH when the switch is open, and LOW when it is closed.

 created 14 March 2012
 by Scott Fitzgerald

 http://www.arduino.cc/en/Tutorial/InputPullupSerial

 This example code is in the public domain

 */

void setup() {
  //start serial connection
  Serial.begin(9600);
  //configure pin2 as an input and enable the internal pull-up resistor
  pinMode(2, INPUT_PULLUP);
  pinMode(13, OUTPUT);

}

void loop() {
  //read the pushbutton value into a variable
  int sensorVal = digitalRead(2);
  //print out the value of the pushbutton
  Serial.println(sensorVal);

  // Keep in mind the pullup means the pushbutton's
  // logic is inverted. It goes HIGH when it's open,
  // and LOW when it's pressed. Turn on pin 13 when the
  // button's pressed, and off when it's not:
  if (sensorVal == HIGH) {
    digitalWrite(13, LOW);
  } else {
    digitalWrite(13, HIGH);
  }
}
Code Indonesia
/*
LED menyala oleh PUSHBUTTON
Jika PUSHBUTTON di tekan
LED akan menyala

PUSBUTTON di sambungkan ke PIN 2 dan ground melalui resistor
ujung lain PUSHBUTTON di sambungkan +5V
*/
// set pin:
const int buttonPin = 2;     // pin pushbutton
const int ledPin =  13;      // pin LED
// kondisi pushbutton
int buttonState = 0;

void setup() {
  // LED Pin OUTOUT
  pinMode(ledPin, OUTPUT);
  // pushbutton pin INPUT
  pinMode(buttonPin, INPUT);
}
void loop() {
  // baca kondisi pushbutton:
  buttonState = digitalRead(buttonPin);
  // check if pushbutton ditekan.
  // buttonState akan HIGH jika di tekan:
  if (buttonState == HIGH) {
    // LED nyala:
    digitalWrite(ledPin, HIGH);
  } else {
    // LED mati:
    digitalWrite(ledPin, LOW);
  }
}

