Cisco: BGP 2 BGP redistribute 2 OSPF
Revision as of 05:34, 28 December 2018 by Onnowpurbo (talk | contribs) (→Main / Backup Link Setup di ISP3)
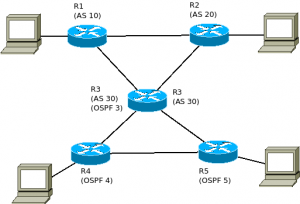
Ada tiga (3) ISP
ISP1:
IP 192.168.1.1/24 menuju ISP3
IP 192.168.3.1/24 menuju ISP2
AS 10
IP 10.100.100.0/24
IP 10.100.200.0/24
ISP2
IP 192.168.2.1/24 - menuju ISP3
IP 192.168.3.2/24 - menuju ISP1
AS 20
IP 10.10.10.0/24
IP 10.10.20.0/24
ISP3 (kita)
IP 192.168.1.2/24 - menuju ISP1
IP 192.168.2.2/24 - menuju ISP2
AS 30
IP 10.1.1.0/24
IP 10.1.2.0/24
Sambungan Fisik
ISP1
ISP1 Eth1/0 -> ISP3 Eth1/0
ISP1 Eth1/1 -> ISP2 Eth1/1
ISP2 Eth1/0 -> ISP3 Eth1/1

ISP1 Eth1/2 10.100.100.1/24
ISP1 Eth1/3 10.100.200.1/24

ISP2 Eth1/2 10.10.10.1/24
ISP2 Eth1/3 10.10.20.1/24

ISP3 Eth1/2 10.1.1.1/24
ISP3 Eth1/3 10.1.2.1/24
Setup connection
ISP1
enable
configure terminal
  interface Ethernet1/0
    ip address 192.168.1.1 255.255.255.0
    no shutdown
    exit
  interface Ethernet1/1
    ip address 192.168.3.1 255.255.255.0
    no shutdown
    exit
  interface Ethernet1/2
    ip address 10.100.100.1 255.255.255.0
    no shutdown
    exit
  interface Ethernet1/3
    ip address 10.100.200.1 255.255.255.0
    no shutdown
    exit
 end
ISP2
enable
configure terminal
  interface Ethernet1/0
    ip address 192.168.2.1 255.255.255.0
    no shutdown
    exit
  interface Ethernet1/1
    ip address 192.168.3.2 255.255.255.0
    no shutdown
    exit
  interface Ethernet1/2
    ip address 10.10.10.1 255.255.255.0
    no shutdown
    exit
  interface Ethernet1/3
    ip address 10.10.20.1 255.255.255.0
    no shutdown
    exit
 end
ISP3
enable
configure terminal
  interface Ethernet1/0
    ip address 192.168.1.2 255.255.255.0
    no shutdown
    exit
  interface Ethernet1/1
    ip address 192.168.2.2 255.255.255.0
    no shutdown
    exit
  interface Ethernet1/2
    ip address 10.1.1.1 255.255.255.0
    no shutdown
    exit
  interface Ethernet1/3
    ip address 10.1.2.1 255.255.255.0
    no shutdown
    exit
 end
R4
R5
BGP Peering
Consider that IP connectivity between ISPs edge routers and Our Core router is already set up and working properly. So we can start to establish BGP peering to both ISPs.
ISP1:
enable
configure terminal
  router bgp 10
  bgp router-id 192.168.1.1
    ! address-family ipv4 unicast
    network 10.100.100.0 mask 255.255.255.0
    network 10.100.200.0 mask 255.255.255.0
    neighbor 192.168.3.2 remote-as 20
    neighbor 192.168.1.2 remote-as 30
    neighbor 192.168.3.2 activate
    neighbor 192.168.1.2 activate
    ! neighbor 192.168.3.2 default-originate
    ! neighbor 192.168.1.2 default-originate
  end
ISP2:
enable
configure terminal
  router bgp 20
  bgp router-id 192.168.2.1
    ! address-family ipv4 unicast
    network 10.10.10.0 mask 255.255.255.0
    network 10.10.20.0 mask 255.255.255.0
    neighbor 192.168.3.1 remote-as 10
    neighbor 192.168.2.2 remote-as 30
    neighbor 192.168.3.1 activate
    neighbor 192.168.2.2 activate
  end
Main / Backup Link Setup di ISP3
Lakukan
- accept network kita sendiri
- drop semua tabel IP lainnya, karena kita tidak mau menjadi transit provider
- BGP AS prepend - menaikan AS path ke salah satu ISP (disini ISP1)
ISP3:
enable
configure terminal
  router bgp 30
  bgp router-id 192.168.1.2
    network 10.1.1.0 mask 255.255.255.0
    network 10.1.2.0 mask 255.255.255.0
    neighbor 192.168.1.1 remote-as 10
  end
OSPF
ISP3
enable configure terminal
 !
 ! area 0 = backbone
 router ospf 3
 network 10.10.1.0 0.0.0.3 area 0.0.0.0
 network 10.10.1.4 0.0.0.3 area 0.0.0.0
 end
R4
enable
configure terminal
 !
 ! area 0 = backbone
 router ospf 4
 network 10.10.1.0 0.0.0.3 area 0.0.0.0
 network 10.10.1.4 0.0.0.3 area 0.0.0.0
 end
R5
enable
configure terminal
  !
  ! area 0 = backbone
  router ospf 5
  network 10.10.1.0 0.0.0.3 area 0.0.0.0
  network 10.10.1.4 0.0.0.3 area 0.0.0.0
  end
Cek
! perhatikan AS 30 di tambahkan 5x ke routing ke arah AS 10
!
show ip bgp
show ip route
show ip bgp 10.100.1000.0/24
show ip bgp neighbors 192.168.2.2 advertised-routes
show ip bgp neighbor 192.168.1.1 routes
show bgp ipv4 unicast neighbors
show bgp ipv4 unicast summary
Referensi
- https://www.cisco.com/c/en/us/td/docs/ios-xml/ios/iproute_bgp/configuration/xe-16/irg-xe-16-book/configuring-a-basic-bgp-network.html
- https://wiki.mikrotik.com/wiki/Manual:Simple_BGP_Multihoming
