WSPR: RaspberryPi
Raspberry Pi bareback LF/MF/HF/VHF WSPR transmitter
Membuat WSPR beacon sederhana dengan RaspberryPi dengan menyambungkan GPIO port ke Antenna (dan Low Pass Filter), dapat beroperasi di band LF, MF, HF, dan VHF dari 0 s/d 250 MHz.
Source yang ada sekarang ini compatible dengan Raspberry Pi dan Raspberry Pi 2.
Hardware
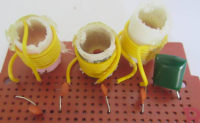
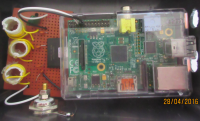
Penampakan hasil solderan :)
Komponen dan Peralatan yang dibutuhkan
Komponen semua ada di Lindetives Glodok / Tokopedia
- RaspberryPi - Rp. 500.000-an
- SD Card (2-4Gb yang besar) untuk sistem operasi Raspbian - Rp. 50.000-an
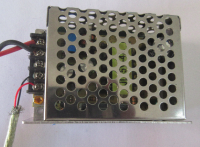
- Switching Power Supply 5V 3A - Rp. 80.000-an
- Kabel USB charger - Rp. 10.000-an
- Kabel USB Extender - Rp. 10.000-an
- Connector Coax Female untuk body - Rp. 25.000-an
- 100nF
- 82pF (2 buah)
- 220pF (2 buah)
- Koker untuk koil (3 buah)
- Kawat kecil / kawat email
- Kabel Jumper (Rp. 20.000 isinya banyak banget)
- PCB prototyping (yang bolong2)
- Box Plastik buatan dalam negeri yang agak besar (atau box makanan juga OK)
Alat
- Solder
- Timah
- Multimeter
- Capacitance / Inductance Meter (kalau ada)
- Tang Potong
- Cutter
- Pengupas Kabel
Instalasi
Pastikan kita menggunakan kernel yang terakhir dengan cara mengupdate sistem yang kita gunakan. Kernel terakhir termasuk berbagai perbaikan yang memperbaiki keakuratan pengukuran ppm menggunakan NTP.
Lakukan:
sudo apt-get update
sudo apt-get dist-upgrade
Download dan compile code:
sudo apt-get install git
git clone https://github.com/JamesP6000/WsprryPi.git
cd WsprryPi
make
Baca file BUILD untuk detail lebih lanjut.
Penggunaan (WSPR --help output):
Penggunaan
wspr [options] callsign locator tx_pwr_dBm f1 <f2> <f3> ...
atau
wspr [options] --test-tone f
Opsi:
-h --help
     Print out this help screen.
-p --ppm ppm
     Known PPM correction to 19.2MHz RPi nominal crystal frequency.
-s --self-calibration
     Call ntp_adjtime() before every transmission to obtain the PPM error of the xtal.
-r --repeat
     Repeatedly, and in order, transmit on all the specified freqs.
-x --terminate <n>
     Terminate after n transmissions have been completed.
-o --offset
     Add a random frequency offset to each transmission:
       +/- 80 Hz for WSPR
       +/- 8 Hz for WSPR-15
-t --test-tone freq
     Simply output a test tone and the specified frequency. Only used
     for debugging and to verify calibration.
-n --no-delay
     Transmit immediately, do not wait for a WSPR TX window. Used
     for testing only.
Frekuensi yang digunakan dapat menggunakan Frekuensi absolut dari TX carrier, atau menggunakan string berikut. Jika string digunakan, maka pancaran akan dilakukan di tengah-tengah dari wilayah WSPR dari band terpilih. Pilihan string,
LF LF-15 MF MF-15 160m 160m-15 80m 60m 40m 30m 20m 17m 15m 12m 10m 6m 4m 2m
-15 menunjukan bagian WSPR-15 dari band
Jika kita tidak ingin memancar, atau membuat gap antar satu pancaran dengan pancaran yang lain, kita dapat melakukan dengan menyebutkan frekuensi TX sebagai 0.
Perlu di catat bahwa 'callsign', 'locator', dan 'tx_power_dBm' akan langsung digunakan untuk mengisi field yang ada pada WSPR message. Biasanya, tx_power_dBm yang digunakan adalah 10, yang merepresentasikan dari power yang dikeluarkan oleh RaspberryPi. Set nilai ini jika kita menggunakan external amplifier.
Lisensi Radio / RF
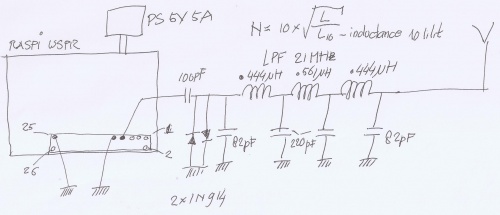
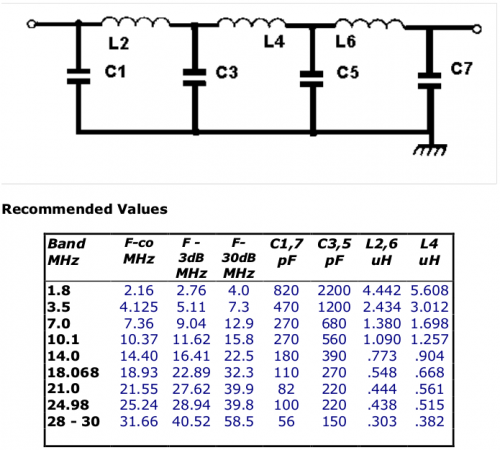
Agar kita dapat memancar secara legal dalam experimen ini, kita harus memiliki lisensi amatir radio / ORARI. Karena sinyal output adalah sinyal kotak (square wave), maka kita HARUS memasang Low Pass Filter (LPF). Sambungkan LPF (via C coupling) ke pin GPIO4 (GPCLK0) dan GND yang merupakan pin 7 dan 9 pada header P1. Pin terdekat dengan label P1 adalah pin 1, dan tetangga ke 3 dan 4-nya adalah pin 7 dan 9.
Untuk melihat pin layout kita dapat menggunakan http://elinux.org/RPi_Low-level_peripherals . Sementara contoh Low Pass Filter (LPF) dapat dilihat di http://www.gqrp.com/harmonic_filters.pdf
Power output yang akan keluar dari RaspberryPi adalah 10mW (+10dBm) pada beban 50 Ohm. Tampaknya ini kecil sekali, tapi jika kita sambungkan ke antenna dipole sederhana ini akan dapat mencapai beberapa ribu kilometer.
Karena RaspberryPi tidak meredam ripple dan noise dari power supply 5V USB, sangat DISARANKAN untuk menggunakan switching power supply yang baik yang mempunyai kemampuan untuk menekan ripple. Ripple dari power supply akan terlihat sebagai hasil mixing dari transmit carrier sekitar 100/120Hz.
DO NOT expose GPIO4 to voltages or currents that are above the specified Absolute Maximum limits. GPIO4 outputs a digital clock in 3V3 logic, with a maximum current of 16mA. As there is no current protection available and a DC component of 1.6V, DO NOT short-circuit or place a resistive (dummy) load straight on the GPIO4 pin, as it may draw too much current. Instead, use a decoupling capacitor to remove DC component when connecting the output dummy loads, transformers, antennas, etc. DO NOT expose GPIO4 to electro- static voltages or voltages exceeding the 0 to 3.3V logic range; connecting an antenna directly to GPIO4 may damage your RPi due to transient voltages such as lightning or static buildup as well as RF from other transmitters operating into nearby antennas. Therefore it is RECOMMENDED to add some form of isolation, e.g. by using a RF transformer, a simple buffer/driver/PA stage, two schottky small signal diodes back to back.
TX Timing
Software ini menggunakan system time untuk menentukan kapan mulai pancaran WSPR, untuk memastikan system time sinkron dengan presisi 1 detik kita dapat menggunakan sinkronisasi NTP (Network Time Protocol) atau set waktu secara manual menggunakan perintah date.
Sebuah broadcast WSPR akan mulai pada menit genap dan akan membutuhkwn 2 menit untuk WSPR-2. Sementara untuk WSPR-15 akan mulai pada :00, :15, :30,:45 dan akan membutuhkan 15 menit untuk setiap beacon. Setiap pancaran akan berisi callsign, 4 digit Maidenhead square locator dan transmission power. Laporan penerimaan dapat dilihat di Weak Signal Propagation Reporter Network pada http://wsprnet.org/drupal/wsprnet/spots
Calibration
Frequency calibration is REQUIRED to ensure that the WSPR-2 transmission occurs within the narrow 200 Hz band. The reference crystal on your RPi might have an frequency error (which in addition is temp. dependent -1.3Hz/degC @10MHz). To calibrate, the frequency might be manually corrected on the command line or a PPM correction could be specified on the command line.
NTP calibration
NTP automatically tracks and calculates a PPM frequency correction. If you are running NTP on your Pi, you can use the --self-calibration option to have this program querry NTP for the latest frequency correction before each WSPR transmission. Some residual frequency error may still be present due to delays in the NTP measurement loop and this method works best if your Pi has been on for a long time, the crystal's temperature has stabilized, and the NTP control loop has converged.
AM calibration
A practical way to calibrate is to tune the transmitter on the same frequency of a medium wave AM broadcast station; keep tuning until zero beat (the constant audio tone disappears when the transmitter is exactly on the same frequency as the broadcast station), and determine the frequency difference with the broadcast station. This is the frequency error that can be applied for correction while tuning on a WSPR frequency.
Suppose your local AM radio station is at 780kHz. Use the --test-tone option to produce different tones around 780kHz (eg 780100 Hz) until you can successfully zero beat the AM station. If the zero beat tone specified on the command line is F, calculate the PPM correction required as: ppm=(F/780000-1)*1e6 In the future, specify this value as the argument to the --ppm option on the comman line. You can verify that the ppm value has been set correction by specifying --test-tone 780000 --ppm <ppm> on the command line and confirming that the Pi is still zero beating the AM station.
PWM Peripheral
The code uses the RPi PWM peripheral to time the frequency transitions of the output clock. This peripheral is also used by the RPi sound system and hence any sound events that occur during a WSPR transmission will interfere with WSPR transmissions. Sound can be permanently disabled by editing /etc/modules and commenting out the snd-bcm2835 device.
Example usage
Brief help screen
./wspr --help
Transmit a constant test tone at 780 kHz.
sudo ./wspr --test-tone 780e3
Using callsign N9NNN, locator EM10, and TX power 33 dBm, transmit a single WSPR transmission on the 20m band using NTP based frequency offset calibration.
sudo ./wspr --self-calibration N9NNN EM10 33 20m
Transmit a WSPR transmission slightly off-center on 30m every 10 minutes for a total of 7 transmissions, and using a fixed PPM correction value. sudo
sudo ./wspr --repeat --terminate 7 --ppm 43.17 N9NNN EM10 33 10140210 0 0 0 0
Transmit repeatedly on 40m, use NTP based frequency offset calibration, and add a random frequency offset to each transmission to minimize collisions with other transmissions.
sudo ./wspr --repeat --offset --self-calibration N9NNN EM10 33 40m
Contoh lain untuk station YB0NNN dengan antenna tri-bander 40m, 20m, 15m
sudo ./wspr --repeat --offset --self-calibration YB0NNN OI33 33 40m 0 0 0 0 20m 0 0 0 0 15m 0 0 0 0
Kita dapat memasukan perintah di atas di /etc/rc.local atau di crontab
sudo ./wspr <[prefix]/callsign[/suffix]> <locator> <power in dBm> [<frequency in Hz> ...]
       e.g.: sudo ./wspr PA/K1JT JO21 10 7040074 0 0 10140174 0 0
       where 0 frequency represents a interval for which TX is disabled,
       wspr-2 or wspr-15 mode selection based on specified frequency.
WSPR is used on the following frequencies (local restriction may apply):
    LF   137400 - 137600
         137600 - 137625 (WSPR-15)
    MF   475600 - 475800
         475800 - 475825 (WSPR-15)
   160m  1838000 - 1838200
         1838200 - 1838225 (WSPR-15)
    80m  3594000 - 3594200
    60m  5288600 - 5288800
    40m  7040000 - 7040200
    30m  10140100 - 10140300
    20m  14097000 - 14097200
    17m  18106000 - 18106200
    15m  21096000 - 21096200
    12m  24926000 - 24926200
    10m  28126000 - 28126200
     6m  50294400 - 50294600
     4m  70092400 - 70092600
     2m  144490400 -144490600
Credits
Credits goes to Oliver Mattos and Oskar Weigl who implemented PiFM [1] based on the idea of exploiting RPi DPLL as FM transmitter.
Dan MD1CLV combined this effort with WSPR encoding algorithm from F8CHK, resulting in WsprryPi a WSPR beacon for LF and MF bands.
Guido PE1NNZ <pe1nnz@amsat.org> extended this effort with DMA based PWM modulation of fractional divider that was part of PiFM, allowing to operate the WSPR beacon also on HF and VHF bands. In addition time-synchronisation and double amount of power output was implemented.
Peroulas <james@peroulas.com> added several command line options, a makefile, improved frequency generation precision so as to be able to precisely generate a tone at a fraction of a Hz, and added a self calibration feature where the code attempts to derrive frequency calibration information from an installed NTP deamon. Furthermore, the TX length of the WSPR symbols is more precise and does not vary based on system load or PWM clock frequency.
Referensi
- https://github.com/JamesP6000/WsprryPi
- https://github.com/threeme3/WsprryPi
- https://github.com/DanAnkers/WsprryPi
- http://www.raspberrypi.org/wp-content/uploads/2012/02/BCM2835-ARM-Peripherals.pdf
- http://www.scribd.com/doc/127599939/BCM2835-Audio-clocks
- http://www.scribd.com/doc/101830961/GPIO-Pads-Control2
- https://github.com/mgottschlag/vctools/blob/master/vcdb/cm.yaml
- https://www.kernel.org/doc/Documentation/vm/pagemap.txt
- http://www.gqrp.com/harmonic_filters.pdf
