Difference between revisions of "Digital Ampere Meter: Callibration"
Jump to navigation
Jump to search
Onnowpurbo (talk | contribs) (Created page with "==Calibration and Zero Adjustment== Periodic adjustment of the meter is possible. With the meter turned off (power removed), apply a short (jumper) between test points A and...") |
Onnowpurbo (talk | contribs) |
||
| Line 8: | Line 8: | ||
[[File:DVAM-02-Calibration.jpg|center|200px|thumb]] | [[File:DVAM-02-Calibration.jpg|center|200px|thumb]] | ||
| + | |||
| + | |||
| + | ==Pranala Menarik== | ||
| + | |||
| + | * [[Power Supply]] | ||
Latest revision as of 06:14, 26 February 2020
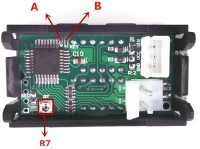
Calibration and Zero Adjustment
Periodic adjustment of the meter is possible. With the meter turned off (power removed), apply a short (jumper) between test points A and B. With the jumper in place, apply power to the meter which will be automatically calibrated to zero. Remove the jumper placed between A and B.
The current display can also be adjusted through the trim pot R7. Simply apply a known current across the meter of approximately 25A (mid-way between the maximum value). Adjust R7 until the meter displays the correct current reading. Digital Panel Meter - Voltage and Current - Calibration and Zero Adjustment
