Difference between revisions of "Orange: Hierarchical Clustering"
Onnowpurbo (talk | contribs) |
Onnowpurbo (talk | contribs) |
||
| Line 11: | Line 11: | ||
Selected Data: instances selected from the plot | Selected Data: instances selected from the plot | ||
| − | |||
Data: data with an additional column showing whether an instance is selected | Data: data with an additional column showing whether an instance is selected | ||
The widget computes hierarchical clustering of arbitrary types of objects from a matrix of distances and shows a corresponding dendrogram. | The widget computes hierarchical clustering of arbitrary types of objects from a matrix of distances and shows a corresponding dendrogram. | ||
| − | + | [[File:HierarchicalClustering-stamped.png|center|200px|thumb]] | |
The widget supports four ways of measuring distances between clusters: | The widget supports four ways of measuring distances between clusters: | ||
| − | |||
Single linkage computes the distance between the closest elements of the two clusters | Single linkage computes the distance between the closest elements of the two clusters | ||
| − | |||
Average linkage computes the average distance between elements of the two clusters | Average linkage computes the average distance between elements of the two clusters | ||
| − | |||
Weighted linkage uses the WPGMA method | Weighted linkage uses the WPGMA method | ||
| − | |||
Complete linkage computes the distance between the clusters’ most distant elements | Complete linkage computes the distance between the clusters’ most distant elements | ||
| − | |||
Labels of nodes in the dendrogram can be chosen in the Annotation box. | Labels of nodes in the dendrogram can be chosen in the Annotation box. | ||
| − | |||
Huge dendrograms can be pruned in the Pruning box by selecting the maximum depth of the dendrogram. This only affects the display, not the actual clustering. | Huge dendrograms can be pruned in the Pruning box by selecting the maximum depth of the dendrogram. This only affects the display, not the actual clustering. | ||
| − | |||
The widget offers three different selection methods: | The widget offers three different selection methods: | ||
| − | |||
Manual (Clicking inside the dendrogram will select a cluster. Multiple clusters can be selected by holding Ctrl/Cmd. Each selected cluster is shown in a different color and is treated as a separate cluster in the output.) | Manual (Clicking inside the dendrogram will select a cluster. Multiple clusters can be selected by holding Ctrl/Cmd. Each selected cluster is shown in a different color and is treated as a separate cluster in the output.) | ||
| − | |||
Height ratio (Clicking on the bottom or top ruler of the dendrogram places a cutoff line in the graph. Items to the right of the line are selected.) | Height ratio (Clicking on the bottom or top ruler of the dendrogram places a cutoff line in the graph. Items to the right of the line are selected.) | ||
| − | |||
Top N (Selects the number of top nodes.) | Top N (Selects the number of top nodes.) | ||
| − | |||
Use Zoom and scroll to zoom in or out. | Use Zoom and scroll to zoom in or out. | ||
| − | |||
If the items being clustered are instances, they can be added a cluster index (Append cluster IDs). The ID can appear as an ordinary Attribute, Class attribute or a Meta attribute. In the second case, if the data already has a class attribute, the original class is placed among meta attributes. | If the items being clustered are instances, they can be added a cluster index (Append cluster IDs). The ID can appear as an ordinary Attribute, Class attribute or a Meta attribute. In the second case, if the data already has a class attribute, the original class is placed among meta attributes. | ||
| − | |||
The data can be automatically output on any change (Auto send is on) or, if the box isn’t ticked, by pushing Send Data. | The data can be automatically output on any change (Auto send is on) or, if the box isn’t ticked, by pushing Send Data. | ||
| − | |||
Clicking this button produces an image that can be saved. | Clicking this button produces an image that can be saved. | ||
| − | |||
Produce a report. | Produce a report. | ||
| − | + | ==Contoh== | |
The workflow below shows the output of Hierarchical Clustering for the Iris dataset in Data Table widget. We see that if we choose Append cluster IDs in hierarchical clustering, we can see an additional column in the Data Table named Cluster. This is a way to check how hierarchical clustering clustered individual instances. | The workflow below shows the output of Hierarchical Clustering for the Iris dataset in Data Table widget. We see that if we choose Append cluster IDs in hierarchical clustering, we can see an additional column in the Data Table named Cluster. This is a way to check how hierarchical clustering clustered individual instances. | ||
| − | + | [[File:HierarchicalClustering-Example.png|center|200px|thumb]] | |
In the second example, we loaded the Iris dataset again, but this time we added the Scatter Plot, showing all the instances from the File widget, while at the same time receiving the selected instances signal from Hierarchical Clustering. This way we can observe the position of the selected cluster(s) in the projection. | In the second example, we loaded the Iris dataset again, but this time we added the Scatter Plot, showing all the instances from the File widget, while at the same time receiving the selected instances signal from Hierarchical Clustering. This way we can observe the position of the selected cluster(s) in the projection. | ||
| − | + | [[File:HierarchicalClustering-Example2.png|center|200px|thumb]] | |
| − | |||
Revision as of 08:29, 24 January 2020
Sumber: https://docs.biolab.si//3/visual-programming/widgets/unsupervised/hierarchicalclustering.html
Groups items using a hierarchical clustering algorithm.
Inputs
Distances: distance matrix
Outputs
   Selected Data: instances selected from the plot
   Data: data with an additional column showing whether an instance is selected
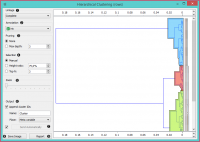
The widget computes hierarchical clustering of arbitrary types of objects from a matrix of distances and shows a corresponding dendrogram.
   The widget supports four ways of measuring distances between clusters:
       Single linkage computes the distance between the closest elements of the two clusters
       Average linkage computes the average distance between elements of the two clusters
       Weighted linkage uses the WPGMA method
       Complete linkage computes the distance between the clusters’ most distant elements
   Labels of nodes in the dendrogram can be chosen in the Annotation box.
   Huge dendrograms can be pruned in the Pruning box by selecting the maximum depth of the dendrogram. This only affects the display, not the actual clustering.
   The widget offers three different selection methods:
       Manual (Clicking inside the dendrogram will select a cluster. Multiple clusters can be selected by holding Ctrl/Cmd. Each selected cluster is shown in a different color and is treated as a separate cluster in the output.)
       Height ratio (Clicking on the bottom or top ruler of the dendrogram places a cutoff line in the graph. Items to the right of the line are selected.)
       Top N (Selects the number of top nodes.)
   Use Zoom and scroll to zoom in or out.
   If the items being clustered are instances, they can be added a cluster index (Append cluster IDs). The ID can appear as an ordinary Attribute, Class attribute or a Meta attribute. In the second case, if the data already has a class attribute, the original class is placed among meta attributes.
   The data can be automatically output on any change (Auto send is on) or, if the box isn’t ticked, by pushing Send Data.
   Clicking this button produces an image that can be saved.
   Produce a report.
Contoh
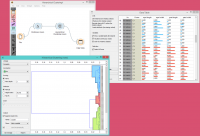
The workflow below shows the output of Hierarchical Clustering for the Iris dataset in Data Table widget. We see that if we choose Append cluster IDs in hierarchical clustering, we can see an additional column in the Data Table named Cluster. This is a way to check how hierarchical clustering clustered individual instances.
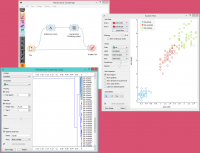
In the second example, we loaded the Iris dataset again, but this time we added the Scatter Plot, showing all the instances from the File widget, while at the same time receiving the selected instances signal from Hierarchical Clustering. This way we can observe the position of the selected cluster(s) in the projection.


