Difference between revisions of "VoIP: Instalasi Twinkle VoIP Client di Linux"
Onnowpurbo (talk | contribs) |
Onnowpurbo (talk | contribs) |
||
| Line 5: | Line 5: | ||
==Konfigurasi User Profile== | ==Konfigurasi User Profile== | ||
| + | |||
| + | Setelah di instalasi Twinkle dapat di jalankan melalui perintah | ||
| + | |||
| + | Applications -> Internet -> Twinkle | ||
[[Image:Twinkle-userprofile1.jpeg|center|200px|thumb]] | [[Image:Twinkle-userprofile1.jpeg|center|200px|thumb]] | ||
| + | |||
| + | Saat pertama kali twinkle di jalankan maka akan di tawarkan untuk membuat user profile untuk account [[VoIP]]. Tekan tombol '''OK''' untuk meng-iya-kan. | ||
| + | |||
[[Image:Twinkle-userprofile2.jpeg|center|200px|thumb]] | [[Image:Twinkle-userprofile2.jpeg|center|200px|thumb]] | ||
| + | |||
| + | Untuk memudahkan tekan tombol '''Wizard'''. | ||
| + | |||
[[Image:Twinkle-userprofile3.jpeg|center|200px|thumb]] | [[Image:Twinkle-userprofile3.jpeg|center|200px|thumb]] | ||
| + | |||
| + | Pertama-tama kita perlu memberikan nama untuk profile account [[VoIP]] yang akan kita buat. | ||
| + | |||
[[Image:Twinkle-userprofile4.jpeg|center|200px|thumb]] | [[Image:Twinkle-userprofile4.jpeg|center|200px|thumb]] | ||
| + | |||
| + | Misalnya VoIPAccount .. tentu saja, kita dapat memilih nama lain yang kita suka. | ||
| + | |||
[[Image:Twinkle-userprofile5.jpeg|center|200px|thumb]] | [[Image:Twinkle-userprofile5.jpeg|center|200px|thumb]] | ||
| + | |||
| + | Masukan data yang di perlukan, yaitu, | ||
| + | |||
| + | Your name | ||
| + | User name | ||
| + | Domain | ||
| + | Authentication name | ||
| + | Password | ||
| + | SIP proxy | ||
| + | |||
[[Image:Twinkle-userprofile6.jpeg|center|200px|thumb]] | [[Image:Twinkle-userprofile6.jpeg|center|200px|thumb]] | ||
| + | |||
| + | Di atas adalah contoh konfigurasi account [[VoIP]] 2000@192.168.0.3 yang terdaftar pada [[softswitch]] buatan sendiri dengan [[alamat IP]] 192.168.0.3. | ||
| + | |||
[[Image:Twinkle-userprofile7.jpeg|center|200px|thumb]] | [[Image:Twinkle-userprofile7.jpeg|center|200px|thumb]] | ||
| + | |||
| + | Di atas adalah contoh konfigurasi account [[VoIP]] 123456@voiprakyat.or.id yang terdaftar pada [[softswitch]] [[VoIP Rakyat]] voiprakyat.or.id | ||
| + | |||
[[Image:Twinkle-userprofile8.jpeg|center|200px|thumb]] | [[Image:Twinkle-userprofile8.jpeg|center|200px|thumb]] | ||
| + | |||
| + | Tekan tombol '''OK''' jika telah selesai, | ||
| + | |||
==Konfigurasi System== | ==Konfigurasi System== | ||
Revision as of 11:27, 21 December 2009
Instalasi
sudo apt-get install twinkle
Konfigurasi User Profile
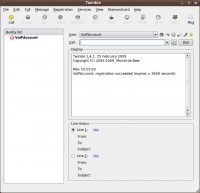
Setelah di instalasi Twinkle dapat di jalankan melalui perintah
Applications -> Internet -> Twinkle
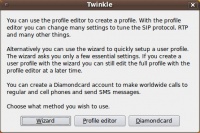
Saat pertama kali twinkle di jalankan maka akan di tawarkan untuk membuat user profile untuk account VoIP. Tekan tombol OK untuk meng-iya-kan.
Untuk memudahkan tekan tombol Wizard.
Pertama-tama kita perlu memberikan nama untuk profile account VoIP yang akan kita buat.
Misalnya VoIPAccount .. tentu saja, kita dapat memilih nama lain yang kita suka.
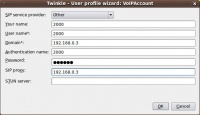
Masukan data yang di perlukan, yaitu,
Your name
User name
Domain
Authentication name
Password
SIP proxy
Di atas adalah contoh konfigurasi account VoIP 2000@192.168.0.3 yang terdaftar pada softswitch buatan sendiri dengan alamat IP 192.168.0.3.
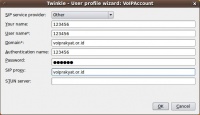
Di atas adalah contoh konfigurasi account VoIP 123456@voiprakyat.or.id yang terdaftar pada softswitch VoIP Rakyat voiprakyat.or.id
Tekan tombol OK jika telah selesai,

