Difference between revisions of "Backtrack: Instalsi LiveUSB"
Jump to navigation
Jump to search
Onnowpurbo (talk | contribs) |
Onnowpurbo (talk | contribs) |
||
| Line 1: | Line 1: | ||
| − | + | Cara membuat LiveUSB Backtrack | |
| − | + | * Masukan USB drive (minimal 2Gbyte) | |
| − | + | * Format USB drive ke FAT32 (misalnya USB drive di /dev/sdb1) | |
| − | + | ||
| − | + | # mkfs.vfat /dev/sdb1 | |
| − | + | ||
| − | + | * Install [[Penggunaan Unetbootin | UNetbootin]] | |
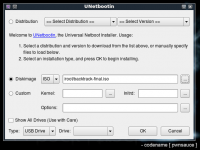
| + | * Jalankan [[Penggunaan Unetbootin | UNetbootin]] gunakan backtrack-finel ISO. | ||
| + | * Pilih USB drive & klik "OK" | ||
[[Image:Unetbootin.png|center|200px|thumb]] | [[Image:Unetbootin.png|center|200px|thumb]] | ||
| + | |||
| + | * Masuk ke BackTrack dengan default username & password root / toor. | ||
Revision as of 08:12, 1 June 2010
Cara membuat LiveUSB Backtrack
- Masukan USB drive (minimal 2Gbyte)
- Format USB drive ke FAT32 (misalnya USB drive di /dev/sdb1)
# mkfs.vfat /dev/sdb1
- Install UNetbootin
- Jalankan UNetbootin gunakan backtrack-finel ISO.
- Pilih USB drive & klik "OK"
- Masuk ke BackTrack dengan default username & password root / toor.
Referensi
- http://www.backtrack-linux.org
- http://www.backtrack-linux.org/downloads/
- http://www.backtrack-linux.org/tutorials/backtrack-forensics/
- http://www.backtrack-linux.org/bt/wireless-drivers/
