Difference between revisions of "Arduino: Blink"
Jump to navigation
Jump to search
Onnowpurbo (talk | contribs) (New page: ==Hardware== * Arduino UNO Di Arduino UNO, pin nomor 13 sudah tersambung ke LED sehingga dapat langsung mempraktekan ==Rangkaian== center|200px|thumb ...) |
Onnowpurbo (talk | contribs) |
||
| (2 intermediate revisions by the same user not shown) | |||
| Line 3: | Line 3: | ||
* Arduino UNO | * Arduino UNO | ||
| − | Di Arduino UNO, pin nomor 13 sudah tersambung ke LED sehingga dapat langsung mempraktekan | + | Di Arduino UNO, pin nomor 13 sudah tersambung ke LED sehingga dapat langsung mempraktekan tanpa perlu menambahkan hardware apapun. |
| − | |||
==Rangkaian== | ==Rangkaian== | ||
| Line 44: | Line 43: | ||
delay(1000); // wait for a second | delay(1000); // wait for a second | ||
} | } | ||
| + | |||
| + | |||
| + | |||
| + | Coba ubah nilai delay, misalnya menjadi 300 dsb. Lihat effek-nya terhadap kedipan LED. | ||
| + | |||
| + | |||
| + | ==Pranala Menarik== | ||
| + | |||
| + | * [[Arduino]] | ||
Latest revision as of 15:51, 25 December 2018
Hardware
- Arduino UNO
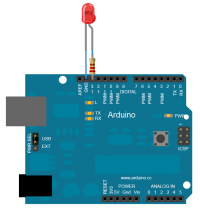
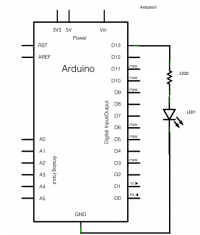
Di Arduino UNO, pin nomor 13 sudah tersambung ke LED sehingga dapat langsung mempraktekan tanpa perlu menambahkan hardware apapun.
Rangkaian
Source Code
/*
  Blink
  Turns on an LED on for one second, then off for one second, repeatedly.

  Most Arduinos have an on-board LED you can control. On the Uno and
  Leonardo, it is attached to digital pin 13. If you're unsure what
  pin the on-board LED is connected to on your Arduino model, check
  the documentation at http://www.arduino.cc

  This example code is in the public domain.

  modified 8 May 2014
  by Scott Fitzgerald
 */


// the setup function runs once when you press reset or power the board
void setup() {
  // initialize digital pin 13 as an output.
  pinMode(13, OUTPUT);
}

// the loop function runs over and over again forever
void loop() {
  digitalWrite(13, HIGH);   // turn the LED on (HIGH is the voltage level)
  delay(1000);              // wait for a second
  digitalWrite(13, LOW);    // turn the LED off by making the voltage LOW
  delay(1000);              // wait for a second
}
Coba ubah nilai delay, misalnya menjadi 300 dsb. Lihat effek-nya terhadap kedipan LED.

