Difference between revisions of "Orange: Network Explorer"
Onnowpurbo (talk | contribs) |
Onnowpurbo (talk | contribs) (→Contoh) |
||
| (4 intermediate revisions by the same user not shown) | |||
| Line 55: | Line 55: | ||
==Memilih a subset== | ==Memilih a subset== | ||
| − | + | Sama seperti widget Scatter Plot, Network Explorer mendukung pemilihan grup. Untuk membuat grup pertama, pilih node dari plot atau highlight dengan mengatur kriteria dan menekan Select. | |
| − | + | Pada contoh di bawah ini, kita memilih satu node (biru). Kemudian kita menggunakan Mark node di sekitar yang kita seleksi untuk meng-highlight tetangga dari node yang dipilih. Kita menggunakan Add New Group untuk membuat grup baru (merah). Menekan Add New Group lagi akan membuat grup lain (hijau). | |
| − | |||
| − | |||
[[File:Network-Explorer-selection.png|center|200px|thumb]] | [[File:Network-Explorer-selection.png|center|200px|thumb]] | ||
| − | |||
==Contoh== | ==Contoh== | ||
| − | + | Dalam contoh dibawah ini, kita menggunakan dataset lastfm yang dapat dimuat dalam Network File widget di bawah Browse documentation networks. Node network adalah musisi, yang ditandai oleh genre yang mereka mainkan, jumlah album yang diproduksi dan sebagainya. Edge adalah jumlah pendengar / listener di LastFm. | |
| − | + | Seluruh dataset divisualisasikan di Network Explorer. Di widget, kita menghapus pewarnaan / coloring dan mengatur ukuran node agar sesuai dengan jumlah album. Kemudian kita memilih beberapa node dari network. Kita dapat mengamati seleksi di Network Explorer (1). | |
[[File:Network-Explorer-Example.png|center|200px|thumb]] | [[File:Network-Explorer-Example.png|center|200px|thumb]] | ||
| − | |||
==Referensi== | ==Referensi== | ||
Latest revision as of 10:36, 1 March 2020
Sumber: https://orange.biolab.si/widget-catalog/networks/networkexplorer/
Explorasi secara visual dari network dan property-nya.
Input
Network: An instance of Network Graph.
Node Subset: A subset of vertices.
Node Data: Information on vertices.
Node Distances: Data on distances between nodes.
Output
Selected sub-network: A network of selected nodes.
Distance Matrix: Distance matrix.
Selected Items: Information on selected vertices.
Highlighted Items: Information on highlighted vertices.
Remaining Items: Information on remaining items (not selected or highlighted).
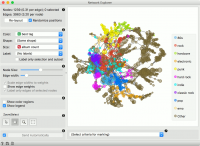
Network Explorer adalah widget utama untuk memvisualisasikan network secara grafis. Ini menampilkan grafik menggunakan Fruchterman-Reingold layout optimization dan memungkinkan pengaturan warna, ukuran dan label node. Seseorang juga dapat meng-highlight node dari properti tertentu dan output-nya.
Visualisasi di Network Explorer berfungsi seperti yang digunakan untuk Scatter Plot. Untuk memilih subset node, gambarkan persegi panjang di sekitar subset. Shift akan menambah grup baru. Ctrl-Shift (Cmd-Shift) akan menambah ke grup yang ada. Alt (Option) akan dihapus dari grup. Menekan di luar network akan menghapus pilihan.
- Information on the network. Reports on the number (and proportion) of nodes and edges. Press ’Re-layout’ to re-compute nodes with Fruchterman-Reingold optimization. Select ‘Randomize positions’ starts from random position of nodes.
- Set the color, shape, size and label of the nodes by attribute. Color will display the 10 most frequent values and color the rest as ‘Other’. Shape is assigned to the 5 most frequent values and the rest is marked as ‘Other’. Label only selection and subset is handy for keeping the projection organized.
- Set the (relative) node size and edge width. By default, edge widths correspond to their weights. To see the weight value, select Show edge weights. By default, only the edges of selected nodes are labeled to keep the projection organized.
- Show color regions colors the projection according to the majority node value. Deselect Show legend to hide the legend.
- Select, zoom, pan and zoom to fit are the options for exploring the graph. The manual selection of data instances works as an angular/square selection tool. Double click to move the projection. Scroll in or out for zoom.
Marking
Menekan Select akan memilih dan menampilkan simpul yang di highlight. Add to Group menambah ke pilihan yang ada, sementara Add New Group membuat grup baru.
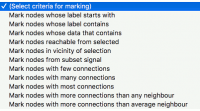
Widget ini memungkinkan pemilihan node berdasarkan kriteria yang ditentukan:
- Mark nodes whose label starts with. Set the condition to highlight the nodes whose label starts with the specified text. Label must be set for the highlighting to work. Press Select to select the highlighted nodes.
- Mark nodes whose label contains. Set the condition to highlight the nodes whose label contains the specified text. Label must be set for the highlighting to work. Press Select to select the highlighted nodes.
- Mark nodes whose data contains. Set the condition to highlight the nodes whose attributes contain the specified text. Press Select to select the highlighted nodes.
- Mark nodes reachable from selected. Highlight the nodes that can be reached from the selected nodes. At least one node has to be selected for the highlighting to work.
- Mark nodes in vicinity of selection. Highlight the nodes that are a selected number of hops away (first degree neighbors, second degree neighbors, etc.).
- Mark nodes from subset signal. Highlight the nodes that are neighbors of the nodes from the Node Subset input.
- Mark nodes with few connections. Highlight the nodes that have equal or less connections than the set number.
- Mark nodes with many connections. Highlight the nodes that have equal or more connections than the set number.
- Mark nodes with most connections. Highlight the nodes that have the most connections. The number of marked specifies how many top connected nodes to highlight (list is ranked).
- Mark nodes with more connections than any neighbor. Highlight the most connected nodes.
- Mark nodes with more connections than average neighbor. Highlight nodes whose degree is above average.
Memilih a subset
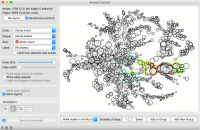
Sama seperti widget Scatter Plot, Network Explorer mendukung pemilihan grup. Untuk membuat grup pertama, pilih node dari plot atau highlight dengan mengatur kriteria dan menekan Select.
Pada contoh di bawah ini, kita memilih satu node (biru). Kemudian kita menggunakan Mark node di sekitar yang kita seleksi untuk meng-highlight tetangga dari node yang dipilih. Kita menggunakan Add New Group untuk membuat grup baru (merah). Menekan Add New Group lagi akan membuat grup lain (hijau).
Contoh
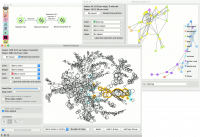
Dalam contoh dibawah ini, kita menggunakan dataset lastfm yang dapat dimuat dalam Network File widget di bawah Browse documentation networks. Node network adalah musisi, yang ditandai oleh genre yang mereka mainkan, jumlah album yang diproduksi dan sebagainya. Edge adalah jumlah pendengar / listener di LastFm.
Seluruh dataset divisualisasikan di Network Explorer. Di widget, kita menghapus pewarnaan / coloring dan mengatur ukuran node agar sesuai dengan jumlah album. Kemudian kita memilih beberapa node dari network. Kita dapat mengamati seleksi di Network Explorer (1).


