Difference between revisions of "Mikrotik: OSPF dengan Quagga"
Jump to navigation
Jump to search
Onnowpurbo (talk | contribs) |
Onnowpurbo (talk | contribs) |
||
| Line 20: | Line 20: | ||
/ip address add address=10.10.1.1/30 interface=ether1 | /ip address add address=10.10.1.1/30 interface=ether1 | ||
/ip address add address=10.10.1.5/30 interface=ether2 | /ip address add address=10.10.1.5/30 interface=ether2 | ||
| − | + | ||
| + | |||
/ip dhcp-client add interface=ether3 disabled=no # kalau ether3 DHCP client | /ip dhcp-client add interface=ether3 disabled=no # kalau ether3 DHCP client | ||
| − | |||
/ip firewall nat add chain=srcnat out-interface=ether3 action=masquareade | /ip firewall nat add chain=srcnat out-interface=ether3 action=masquareade | ||
/ip firewall nat print | /ip firewall nat print | ||
Revision as of 13:14, 18 November 2018
GNS3 Connector
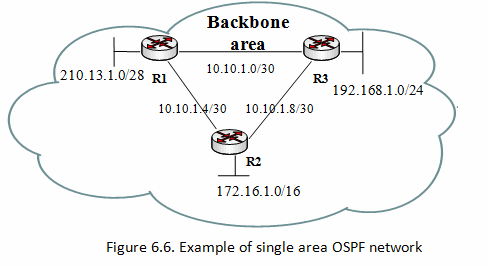
R1 ethernet0 - R3 ethernet0
R1 ethernet1 - R2 ethernet0
R2 ethernet1 - R3 ethernet1
R2 ethernet2 - 172.16.1.1/16
R3 ethernet2 - 192.168.1.1/24
Konfigurasi
Router1:
/ip address add address=10.10.1.1/30 interface=ether1
/ip address add address=10.10.1.5/30 interface=ether2
/ip dhcp-client add interface=ether3 disabled=no        # kalau ether3 DHCP client
/ip firewall nat add chain=srcnat out-interface=ether3 action=masquareade
/ip firewall nat print
Router2 (Quagga):
vtysh
enable
configure terminal
  interface eth0
    ip address 10.10.1.6/30
    link-detect
    exit
  interface eth1
    ip address 10.10.1.9/30
    link-detect
    exit
  interface eth2
    ip address 172.16.1.1/16
    link-detect
    exit
Router3 (Quagga):
vtysh
enable
configure terminal
  interface eth0
    ip address 10.10.1.2/30
    link-detect
    exit
  interface eth1
    ip address 10.10.1.10/30
    link-detect
    exit
  interface eth2
    ip address 192.168.1.1/24
    link-detect
    exit
Ada tiga (3) elemen dasar konfigurasi OSPF:
- Enable OSPF instance
- OSPF area configuration
- OSPF network configuration
instance name=default sudah ada, tidak perlu di tambahkan, tapi kalau perlu menambahkan caranya adalah sebagai berikut
R1:
/routing ospf instance enable default
R2:
/routing ospf instance add name=default
/routing ospf instance enable default
R3:
/routing ospf instance add name=default
/routing ospf instance enable default
Cek
/routing ospf instance print
Flags: X - disabled
 0   name="default" router-id=0.0.0.0 distribute-default=never
     redistribute-connected=as-type-1 redistribute-static=as-type-1
     redistribute-rip=no redistribute-bgp=no redistribute-other-ospf=no
     metric-default=1 metric-connected=20 metric-static=20 metric-rip=20
     metric-bgp=auto metric-other-ospf=auto in-filter=ospf-in
out-filter=ospf-out
Catatan: Ingat bahwa backbone area-id adalah 0.0.0.0.
R1
/routing ospf network add network=10.10.1.0/30 area=backbone
/routing ospf network add network=10.10.1.4/30 area=backbone
R2
/routing ospf network add network=10.10.1.4/30 area=backbone
/routing ospf network add network=10.10.1.8/30 area=backbone
/routing ospf network add network=172.16.0.0/16 area=backbone
R3
/routing ospf network add network=10.10.1.0/30 area=backbone
/routing ospf network add network=10.10.1.8/30 area=backbone
/routing ospf network add network=192.168.1.0/24 area=backbone
Atau kalau di aggregate
R1:
/routing ospf network add network=10.10.1.0/24 area=backbone
R2:
/routing ospf network add network=172.16.0.0/16 area=backbone
/routing ospf network add network=10.10.1.0/24 area=backbone
R3:
/routing ospf network add network=192.168.1.0/24 area=backbone
/routing ospf network add network=10.10.1.0/24 area=backbone
Verify
Cek
R1:
/routing ospf interface print
/routing ospf neighbor print
/ip route print
Lakukan yang sama untuk R2, R3
Referensi
