Difference between revisions of "Mikrotik: OSPF Sederhana"
Onnowpurbo (talk | contribs) |
Onnowpurbo (talk | contribs) |
||
| Line 23: | Line 23: | ||
| − | + | Ada tiga (3) elemen dasar konfigurasi OSPF: | |
* Enable OSPF instance | * Enable OSPF instance | ||
| Line 29: | Line 29: | ||
* OSPF network configuration | * OSPF network configuration | ||
| + | instance name=default sudah ada, tidak perlu di tambahkan, tapi kalau perlu menambahkan caranya adalah sebagai berikut | ||
R1: | R1: | ||
| − | + | /routing ospf instance> add name=default | |
R2: | R2: | ||
| − | + | /routing ospf instance> add name=default | |
R3: | R3: | ||
| − | + | /routing ospf instance> add name=default | |
Cek | Cek | ||
| − | + | /routing ospf instance> print | |
Flags: X - disabled | Flags: X - disabled | ||
| Line 56: | Line 57: | ||
| − | + | Buat bridge "loopback" untuk R1, R2, R3 | |
| − | + | /interface bridge add name=loopback | |
| + | /ip address add address=10.255.255.1/32 interface=loopback | ||
| + | /routing ospf instance set 0 router-id=10.255.255.1 | ||
| − | + | Catatan: Ingat bahwa backbone area-id adalah 0.0.0.0. | |
| − | + | R1 | |
| − | + | /routing ospf network add network=210.13.1.0/28 area=backbone | |
| + | /routing ospf network add network=0.0.0.0/0 area=backbone # default ke Internet | ||
| + | /routing ospf network add network=10.10.1.0/30 area=backbone | ||
| + | /routing ospf network add network=10.10.1.4/30 area=backbone | ||
| − | + | R2 | |
| − | |||
| − | |||
| − | |||
| − | + | R3 | |
| − | + | ||
| − | + | ||
Instead of typing in each network, you can aggregate networks using appropriate subnet mask. For example, to aggregate 10.10.1.0/30, 10.10.1.4/30, 10.10.1.8/30 networks, you can set up following ospf network: | Instead of typing in each network, you can aggregate networks using appropriate subnet mask. For example, to aggregate 10.10.1.0/30, 10.10.1.4/30, 10.10.1.8/30 networks, you can set up following ospf network: | ||
Revision as of 10:48, 13 November 2018
Router1:
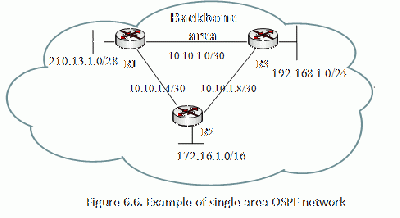
/ip address add address=10.10.1.1/30 interface=ether1
/ip address add address=10.10.1.5/30 interface=ether2
/ip address add address=210.13.1.0/28 interface=ether3  # kalau ether3 statik
/ip dhcp-client add interface=ether3 disabled=no        # kalau ether3 DHCP client
Router2:
/ip address add address=10.10.1.6/30 interface=ether1
/ip address add address=10.10.1.9/30 interface=ether2
/ip address add address=172.16.1.0/16 interface=ether3
Router3:
/ip address add address=10.10.1.2 /30 interface=ether1
/ip address add address=10.10.1.10/30 interface=ether2
/ip address add address=192.168.1.0/24 interface=ether3
Ada tiga (3) elemen dasar konfigurasi OSPF:
- Enable OSPF instance
- OSPF area configuration
- OSPF network configuration
instance name=default sudah ada, tidak perlu di tambahkan, tapi kalau perlu menambahkan caranya adalah sebagai berikut
R1:
/routing ospf instance> add name=default
R2:
/routing ospf instance> add name=default
R3:
/routing ospf instance> add name=default
Cek
/routing ospf instance> print
Flags: X - disabled
 0   name="default" router-id=0.0.0.0 distribute-default=never
     redistribute-connected=as-type-1 redistribute-static=as-type-1
     redistribute-rip=no redistribute-bgp=no redistribute-other-ospf=no
     metric-default=1 metric-connected=20 metric-static=20 metric-rip=20
     metric-bgp=auto metric-other-ospf=auto in-filter=ospf-in
out-filter=ospf-out
Buat bridge "loopback" untuk R1, R2, R3
/interface bridge add name=loopback
/ip address add address=10.255.255.1/32 interface=loopback
/routing ospf instance set 0 router-id=10.255.255.1
Catatan: Ingat bahwa backbone area-id adalah 0.0.0.0.
R1
/routing ospf network add network=210.13.1.0/28 area=backbone
/routing ospf network add network=0.0.0.0/0 area=backbone   # default ke Internet
/routing ospf network add network=10.10.1.0/30 area=backbone
/routing ospf network add network=10.10.1.4/30 area=backbone
R2
R3
Instead of typing in each network, you can aggregate networks using appropriate subnet mask. For example, to aggregate 10.10.1.0/30, 10.10.1.4/30, 10.10.1.8/30 networks, you can set up following ospf network:
[admin@MikroTikR1] /routing ospf network> add network=10.10.1.0/24 area=backbone
R2:
[admin@MikroTikR2] /routing ospf network> add network=172.16.1.0/16 area=backbone
[admin@MikroTikR2] /routing ospf network> add network=10.10.1.0/24 area=backbone
R3:
[admin@MikroTikR3] /routing ospf network> add network=192.168.1.0/24 area=backbone
[admin@MikroTikR3] /routing ospf network> add network=10.10.1.0/24 area=backbone
Verify
You can verify your OSPF operation as follows:
Look at the OSPF interface menu to verify that dynamic entry was created:
[admin@MikroTikR1] /routing ospf interface> print
Check your OSPF neighbors, what DR and BDR is elected and adjacencies established:
[admin@MikroTikR1] /routing ospf neighbor> print
Check router’s routing table (make sure OSPF routes are present):
[admin@MikroTik_CE1] > ip route print
Referensi
