Difference between revisions of "AppInventor: Input text"
Onnowpurbo (talk | contribs) |
Onnowpurbo (talk | contribs) |
||
| Line 8: | Line 8: | ||
The multi-line control is easy to use – and needs just a single line of blocks code to implement! Describing the operation of the control takes more time! | The multi-line control is easy to use – and needs just a single line of blocks code to implement! Describing the operation of the control takes more time! | ||
| − | App View | + | |
| + | ==App View== | ||
The multiline TextBox looks like a single line text box, as shown here, after entering “first line” into the TextBox control as the app is running. | The multiline TextBox looks like a single line text box, as shown here, after entering “first line” into the TextBox control as the app is running. | ||
| − | + | [[Image:Screenshot 2015-04-08-18-03-40-576x1024.png|center|200px|thumb]] | |
| + | |||
To enter a second (or third…) line, tap the green/blue Enter button at the lower right of the onscreen keyboard. Here is the result after typing three lines of text: | To enter a second (or third…) line, tap the green/blue Enter button at the lower right of the onscreen keyboard. Here is the result after typing three lines of text: | ||
| − | + | [[Image:Screenshot 2015-04-08-18-03-57-576x1024.png|center|200px|thumb]] | |
| − | The Designer View | + | |
| + | ==The Designer View== | ||
To set up a multiline TextBox, drag the TextBox control from the palette to the Canvas. Add a Button control and change the text on the button to say “Done:. | To set up a multiline TextBox, drag the TextBox control from the palette to the Canvas. Add a Button control and change the text on the button to say “Done:. | ||
| − | MultilineDesigner | + | [[Image:MultilineDesigner.png|center|200px|thumb]] |
| − | |||
| − | |||
Click the mouse (or select) the TextBox control and then refer to the control’s properties on the right side of the Designer view. In the Properties list, scan down to the MultiLine item and check the checkbox. | Click the mouse (or select) the TextBox control and then refer to the control’s properties on the right side of the Designer view. In the Properties list, scan down to the MultiLine item and check the checkbox. | ||
| − | MultilineProperties | + | [[Image:MultilineProperties.png|center|200px|thumb]] |
| − | Blocks View | + | ==Blocks View== |
After all that description, how do we implement this feature? With one block to hide the keyboard after data entry! | After all that description, how do we implement this feature? With one block to hide the keyboard after data entry! | ||
| − | MultilineBlocks | + | [[Image:MultilineBlocks.png|center|200px|thumb]] |
The trick for the multiline input box is to set the multiline property to true, and then add another control to indicate when data entry is finished. Here, we use a Button and handle the click event by calling the HideKeyboard method of TextBox1. | The trick for the multiline input box is to set the multiline property to true, and then add another control to indicate when data entry is finished. Here, we use a Button and handle the click event by calling the HideKeyboard method of TextBox1. | ||
| Line 41: | Line 42: | ||
To obtain the entered text, refer to the Text property of TextBox1: | To obtain the entered text, refer to the Text property of TextBox1: | ||
| − | Mutliline-text | + | [[Image:Mutliline-text.png|center|200px|thumb]] |
| − | |||
| − | |||
| − | |||
| − | |||
| − | |||
| − | |||
| − | |||
| − | |||
Revision as of 09:44, 6 October 2015
Sumber: http://appinventor.pevest.com/?p=674
The App Inventor TextBox control supports both single line and multi-line input; the TextBox control default to single line mode – and you may not have realized it can support multiple line text input too!
In single line input, text is entered using the on screen keyboard, followed by the Enter key (or you can use an external Bluetooth keyboard). Once the enter key is pressed, the on screen keyboard goes away.
Multi-line mode is enabled by checking the Multiline checkbox item in the control properties. However, the Enter key is used to enter multiple text lines – that means you need to complete the multiline text entry by adding another control, such as a Done button.
The multi-line control is easy to use – and needs just a single line of blocks code to implement! Describing the operation of the control takes more time!
App View
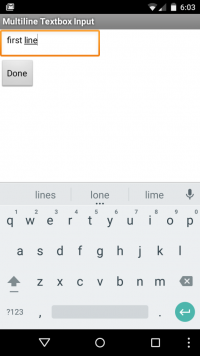
The multiline TextBox looks like a single line text box, as shown here, after entering “first line” into the TextBox control as the app is running.
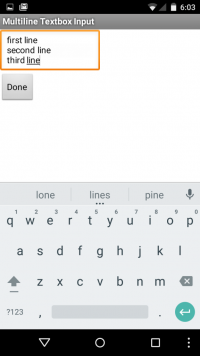
To enter a second (or third…) line, tap the green/blue Enter button at the lower right of the onscreen keyboard. Here is the result after typing three lines of text:
The Designer View
To set up a multiline TextBox, drag the TextBox control from the palette to the Canvas. Add a Button control and change the text on the button to say “Done:.
Click the mouse (or select) the TextBox control and then refer to the control’s properties on the right side of the Designer view. In the Properties list, scan down to the MultiLine item and check the checkbox.
Blocks View
After all that description, how do we implement this feature? With one block to hide the keyboard after data entry!
The trick for the multiline input box is to set the multiline property to true, and then add another control to indicate when data entry is finished. Here, we use a Button and handle the click event by calling the HideKeyboard method of TextBox1.
To obtain the entered text, refer to the Text property of TextBox1:


