Difference between revisions of "Balun Buatan Sendiri 1:1"
Onnowpurbo (talk | contribs) (New page: Sumber: http://195.84.101.101/~goranl/building/aircore_balun/index.html - 1:1 HomeBrew AirCore Balun - 2007.05.20 Made this 'AirCore' balun for use with a singe band portable 80M dipole...) |
Onnowpurbo (talk | contribs) |
||
| Line 35: | Line 35: | ||
(On the images below i use 2mm Cu wire, the measurements given in this text is calculated using 1,5mm cu-wire) | (On the images below i use 2mm Cu wire, the measurements given in this text is calculated using 1,5mm cu-wire) | ||
| + | [[Image:Closeup2.jpg|center|200px|thumb]] | ||
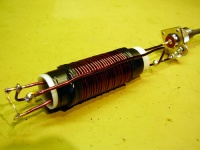
Ready made coil and the test setup | Ready made coil and the test setup | ||
Revision as of 11:34, 26 September 2012
Sumber: http://195.84.101.101/~goranl/building/aircore_balun/index.html
- 1:1 HomeBrew AirCore Balun - 2007.05.20 Made this 'AirCore' balun for use with a singe band portable 80M dipole. The manufacturing is quite simple and the result is a nice and very 'Heavy Duty' baluna.
This type of balun is normally used with broad-band or multi-band wire antennas,- where gamma-match or other narrow-band matching is not suitable. The baluna is also suitable for use with logo-periodic or multi-band directional Yagi antennas.
- Technical data -
SPECIFICATIONS
============================
Frequency responce ... 3-30 MHz Maximun Input Power .. At least 1 KW Input Impedance ...... 50ohm unbalanced Impedance ratio ...... 1:1 (In/Out) Dimensions ........... Weight ...............
- Making the balun -
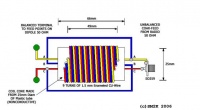
Principle - The coils on an air balun is not different from an Ferrite-balun, in the layout above you see the principle. Two coils (Yellow & red) is used as straight thru-feed, one for center conductor an the other for the shield conductor, they are connected directly to each dipole half, The blue coil is used for reversed 'pick-up' and balances the dipole connections.
The Air-balun is made on a plastic 'Nonconducting' core,- Use a pice of plastic tubing about 25mm in diameter and about 66mm long. Drill tree 2mm holes,- slightly in diagonal in one end, whith about 5mm distance. drill tree 2mm holes in the same manner in the other end of the tube,- distance between the two hole-rows is 49mm.
(On the images below i use 2mm Cu wire, the measurements given in this text is calculated using 1,5mm cu-wire)
Ready made coil and the test setup
Hint! It is best to make one coil at the time, dont trye to put al tree on the core at once.
- Testing the balun - To this moment my only test is the frequency respons shown here. I also need to make som loss/return loss measurements.
Test setup
Frequency response using mini-vna
Parts before final assembly
Inside of so-239 connector at balun bottom
Connection cable to balune core connections
Internal assembly for the antenna Wire attachment and hanger pulley
Drain hole at balun bottom
Antenna Wire attachment and connections


